JavaScript AbortController: Cancel Fetch Requests and Timeouts
Learn AbortController and AbortSignal to cancel fetch requests, build search boxes without old answers, add real timeouts and clean up with one switch.
What you will learn
In the last lesson, you learned how to send requests with fetch. But sending is only half of the story. Sometimes you need to stop a request that is already on its way:
- The user types a new search before the old one finished.
- The user clicks Cancel on a long download.
- The request is taking too long, and you want to give up.
- The user leaves the screen, so nobody needs the answer anymore.
The tool for all of these is the AbortController. You have already met it in the events lesson, where it removed many event listeners with one call. Here you will see that the same small tool can also cancel fetch requests, add real timeouts and even stop your own timers.
By the end of this lesson you will know how to:
- cancel a
fetchrequest and recognise theAbortError - fix the “old answer arrives late” search bug the best way
- add a timeout that really stops the request
- use one switch to cancel many things at once
- make your own functions cancellable
- understand what cancelling does not do
The idea: a stop switch and a wire
Think of a delivery person who is travelling to bring you a parcel. You gave them a buzzer to keep in the pocket. You also kept a stop switch. A wire connects your switch to their buzzer.
If you press the switch, the buzzer rings, and the delivery person turns back immediately. They do not waste more time on the road.
That is the AbortController:
| In the story | In JavaScript |
|---|---|
| The stop switch in your hand | The AbortController (it has the abort() button) |
| The wire and the buzzer | The AbortSignal (controller.signal), which you give to the worker |
| The delivery person | The fetch request (or a listener, or your own function) |
| Pressing the switch | controller.abort() |
| The delivery person turns back | The request stops, and its Promise rejects with an AbortError |
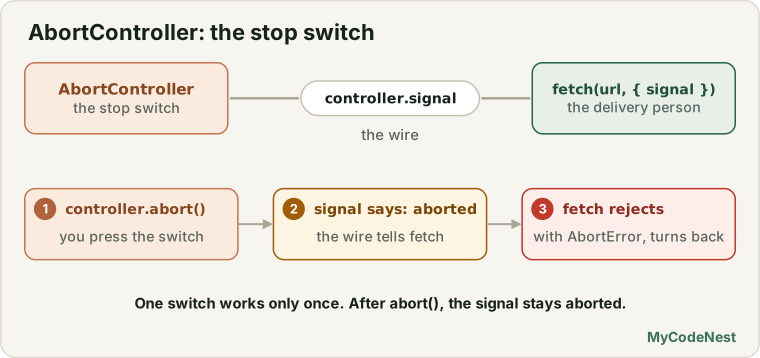
Two facts make the picture complete:
- One switch can have many wires. You can give the same signal to many requests, and one press stops all of them.
- The switch can be pressed only once. After you press it, it stays pressed. You cannot “un-press” it. For a new job, you make a new switch.
In the timers lesson, you cancelled a timer with clearTimeout. The AbortController is like a universal cancel button that works on many kinds of work.
Cancelling a fetch request
There are three steps:
- Create a controller:
new AbortController(). - Give its signal to
fetch, in the options object:{ signal: controller.signal }. - Call
controller.abort()when you want to stop.
const controller = new AbortController();

const promise = fetch(BASE + "/slow", { signal: controller.signal });

setTimeout(() => controller.abort(), 100);   // changed our mind after 0.1 s

try {
  await promise;
} catch (error) {
  console.log(error.name + ": " + error.message);
}
(In the examples of this lesson, BASE is the base address of a server, as in the last lesson, and /slow is a route that takes a long time to answer.)
Output:
AbortError: This operation was abortedWhen you abort, the Promise from fetch rejects with an error whose name is AbortError. The exact message text depends on the browser, but the name is always the same.
An AbortError is not a real error
This is the most important habit. You pressed the switch on purpose. Showing a red “Something went wrong” message to the user would be wrong. So in your catch, check the name and ignore it:
try {
  const response = await fetch(url, { signal: controller.signal });
  const data = await response.json();
  showData(data);
} catch (error) {
  if (error.name === "AbortError") {
    return;                       // cancelled on purpose, nothing to report
  }
  showError(error);               // a real problem
}
What is inside a signal?
The signal is a small object. You will use three things from it:
| Property | What it gives you |
|---|---|
signal.aborted |
false at first, and true after abort() |
signal.reason |
Why it was aborted (by default an AbortError) |
the abort event |
An event that fires at the moment of abort, so you can react |
const controller = new AbortController();

controller.signal.addEventListener("abort", () => {
  console.log("The switch was pressed!");
});

console.log(controller.signal.aborted);   // false

controller.abort();                       // prints "The switch was pressed!"

console.log(controller.signal.aborted);   // true
console.log(controller.signal.reason.name);   // AbortError
You can also give your own reason:
controller.abort(new Error("User left the page"));Then the rejected Promise carries your error, so your catch block can tell the reasons apart:
Error: User left the pageThe switch works only once
A used switch stays pressed. If you give an already aborted signal to fetch, the request fails at once, and it never even starts:
const controller = new AbortController();
controller.abort();

try {
  await fetch(BASE + "/users/1", { signal: controller.signal });
} catch (error) {
  console.log(error.name);   // AbortError (immediately)
}
So a very common bug is reusing one controller for the next request. The second request fails instantly. The rule: make a new AbortController for every new request.
const fresh = new AbortController();
const response = await fetch(BASE + "/users/1", { signal: fresh.signal });
console.log(response.status);   // 200
Aborting also stops reading the body
Remember the parcel from the last lesson: the delivery slip comes first, and then you open the box. The signal also works for the second step. If you abort after the headers arrived but while the body is still coming, response.json() rejects, too:
const controller = new AbortController();
const response = await fetch(BASE + "/slowbody", { signal: controller.signal });

console.log(response.status);          // 200 (the slip arrived)

setTimeout(() => controller.abort(), 100);

try {
  await response.json();               // the box is still arriving...
} catch (error) {
  console.log(error.name);             // AbortError
}
So a single signal protects the whole request, both the waiting for the answer and the reading of it.
Real use case: a Cancel button
Here is the classic. A button starts a long task. A second button cancels it:
let controller = null;

startButton.addEventListener("click", async function () {
  controller = new AbortController();
  const mine = controller;
  status.textContent = "Loading...";

  try {
    const response = await fetch(BASE + "/report", { signal: mine.signal });
    const data = await response.json();
    status.textContent = "Done: " + data.title;
  } catch (error) {
    if (error.name === "AbortError") {
      status.textContent = "Cancelled.";
    } else {
      status.textContent = "Failed: " + error.message;
    }
  } finally {
    if (controller === mine) {
      controller = null;
    }
  }
});

cancelButton.addEventListener("click", function () {
  controller?.abort();      // if there is a running request, stop it
});
Notice controller?.abort(). It uses the optional chaining from the earlier lesson: if no request is running, controller is null, and nothing happens, with no error.
To try this with a real server, you can slow down your own connection. In the debugging lesson, you saw the throttling menu in DevTools (for example Slow 4G). With throttling on, even a fast API becomes slow, and you can press Cancel in time. In the Network panel, a cancelled request is marked as cancelled.
Real use case: a search box without old answers
In the last lesson, you saw the bug where an old search answer arrives after a newer one and overwrites it. We fixed it by giving every request a number and ignoring old answers. That works, but the old request keeps running and wastes the network.
With an AbortController, we can do better: cancel the old request when a new one starts.
let current = null;

async function search(q) {
  if (current) {
    current.abort();                    // stop the previous search
  }

  const controller = new AbortController();
  current = controller;

  try {
    const response = await fetch(BASE + "/search?q=" + q, { signal: controller.signal });
    const data = await response.json();
    console.log("Showing results for: " + data.q);
  } catch (error) {
    if (error.name === "AbortError") {
      console.log("search('" + q + "') was cancelled");
      return;
    }
    throw error;
  }
}
In a test, the search for a was slow (300 ms) and the search for ab was quick (50 ms). We started a, and 20 ms later we started ab:
search('a') was cancelled
Showing results for: ab
The old search was cancelled, and only the newest search showed its result. Combine this with the debounce from the timers lesson (wait until the user pauses typing), and you have a professional search box.
A trap: the old request’s finally
There is one subtle bug that catches many people. Imagine that your function shows a loading flag:
let loading = false;

async function search(q) {
  // ...abort the old one, create a new controller...
  loading = true;

  try {
    // ...fetch...
  } catch (error) {
    // ...
  } finally {
    loading = false;      // WRONG!
  }
}
When the old request is cancelled, its finally block still runs, and it sets loading = false, while the new request is still running. The spinner disappears too early. In the test, right after the old request ended, the naive code said loading = false, but the new search was still running.
The fix is to let only the newest request switch the flag off:
} finally {
  if (controller === current) {
    loading = false;      // RIGHT: only the newest request may do this
  }
}
The same idea was used in the Cancel button code above (if (controller === mine)). The rule: after an await, always ask “am I still the current request?”
Real use case: a timeout that really stops
In the combinators lesson, you made a timeout with Promise.race, and in the last lesson you learned its limit: the slow request keeps running. Now you can fix it.
The modern way is AbortSignal.timeout(ms). It creates a signal that aborts itself after the time:
try {
  await fetch(BASE + "/slow", { signal: AbortSignal.timeout(300) });
} catch (error) {
  console.log(error.name + ": " + error.message);
}
Output:
TimeoutError: The operation was aborted due to timeoutNotice the name: it is TimeoutError, not AbortError. So your catch can tell the two situations apart:
} catch (error) {
  if (error.name === "AbortError") {
    // the user (or your code) cancelled it, so stay quiet
  } else if (error.name === "TimeoutError") {
    showMessage("The server is too slow. Please try again.");
  } else {
    showMessage("Something went wrong.");
  }
}
A fast request is not affected. In the test, a quick request with a 300 ms timeout returned status 200 as usual.
You can also build a timeout by hand with setTimeout (a timers lesson tool) and clearTimeout. This works in every browser, even older ones:
const controller = new AbortController();
const timerId = setTimeout(() => controller.abort(), 300);

try {
  await fetch(BASE + "/slow", { signal: controller.signal });
} catch (error) {
  console.log(error.name);       // AbortError
} finally {
  clearTimeout(timerId);         // always stop the timer
}
Race versus abort: what does the server see?
This is the proof that an abort is better than the Promise.race timeout. Both versions gave the user a timeout error after 200 ms. But look at what the server reported:
Promise.race version  -> server: finished sending /slow
AbortSignal version   -> server: client disconnected before /slow finished
With Promise.race, the browser kept waiting for the answer and downloaded all of it, but nobody used it. With the abort, the browser closed the connection, and the server could stop its work too. On a slow phone network, this saves battery and data.
Combining signals
What if you want both a Cancel button and a timeout? You can combine signals with AbortSignal.any. The combined signal aborts when any of them aborts:
const userController = new AbortController();

const signal = AbortSignal.any([
  userController.signal,          // the Cancel button
  AbortSignal.timeout(5000)       // and a 5 second timeout
]);

const response = await fetch(BASE + "/report", { signal });
In a test, pressing the user switch gave an AbortError, and waiting for the timer gave a TimeoutError, exactly as you would hope.
Note:
AbortSignal.anyis a newer feature. It exists in recent versions of the major browsers, but older ones do not have it. If you must support old browsers, create one controller yourself and call itsabort()from both places (the Cancel button and asetTimeout).
One switch, many things
Because many tasks can share one signal, one abort() can clean up a whole screen. Imagine a panel that loads data and listens to clicks. When the panel closes, you want everything to stop:
let panelController = null;

function openPanel() {
  panelController = new AbortController();
  const signal = panelController.signal;

  loadProfile(signal);                                      // a fetch
  loadOrders(signal);                                       // another fetch
  saveButton.addEventListener("click", onSave, { signal }); // a listener
}

function closePanel() {
  panelController?.abort();     // all of the above stop together
  panelController = null;
}
In a test, one abort() cancelled two running requests at the same time:
both cancelled: rejected/AbortError, rejected/AbortErrorAnd the { signal } option for listeners is exactly what you learned in the events lesson. It all connects: one switch, many wires.
Making your own functions cancellable
You are not limited to fetch. You can make your own async functions listen to a signal. Here is the wait helper from the Promises lesson, with cancel support:
function wait(ms, signal) {
  return new Promise((resolve, reject) => {
    if (signal?.aborted) {
      reject(signal.reason);        // already cancelled, never start
      return;
    }

    const id = setTimeout(resolve, ms);

    signal?.addEventListener("abort", () => {
      clearTimeout(id);             // stop the timer
      reject(signal.reason);        // fail with the AbortError
    }, { once: true });
  });
}
Let us read it, because it ties together many lessons:
- It returns a Promise, like all the helpers you wrote before.
- If the signal is already aborted, it rejects at once. This is the “one-time switch” rule.
- Otherwise it starts a normal timer.
- It listens to the signal’s
abortevent (an event listener, with the{ once: true }option from the events lesson). - When the abort happens, it clears the timer (
clearTimeout) and rejects withsignal.reason. - The
signal?.(optional chaining) lets callers pass no signal at all, and the function still works.
Test it with a 2 second wait that is cancelled after 0.1 seconds:
const controller = new AbortController();
setTimeout(() => controller.abort(), 100);

try {
  await wait(2000, controller.signal);
} catch (error) {
  console.log(error.name);      // AbortError, after about 0.1 s, not 2 s
}

await wait(100);                // without a signal, it works normally
You can try exactly this in the Abort Lab of the practice editor: start the 5 second task, and press Cancel at any moment.
What aborting does NOT do
This is the honest part. An abort only stops your side of the story: it stops waiting, stops downloading and closes the connection. It does not undo work that the server has already started.
Imagine you send a POST request to save an order. You press Cancel 0.1 seconds later. In a test with a practice server, the client reported AbortError, but a moment later the server said:
POST cancelled on the client -> AbortError
but the server saved it anyway: saved = 1
The request had already arrived, so the server finished its job. It is like cancelling a delivery after the parcel has already left the warehouse: you may not get it, but the order was still placed.
This means:
- For
GETrequests (reading data), cancelling is completely safe. - For
POST,PUTandDELETE, be careful. After an abort, you do not know for sure if the change happened. If it matters, ask the server (with aGET) before you try again, to avoid creating a duplicate.
Putting the errors together
In a real app, all the failures you learned about in this section can happen to the same request. A small function can turn each one into a clear decision:
function describeError(error) {
  if (error.name === "AbortError") return null;               // on purpose, say nothing
  if (error.name === "TimeoutError") return "The server is too slow.";
  if (error instanceof HttpError) return "Server problem: status " + error.status;
  return "Network problem: " + error.message;
}| What happened | error.name |
What to do |
|---|---|---|
| You cancelled it | AbortError |
Stay quiet |
| It took too long | TimeoutError |
“Too slow, try again” |
The server said 404, 500… |
HttpError (from the last lesson) |
Show the status |
| No connection, wrong domain, CORS | TypeError |
“Network problem” |
| The body was not JSON | SyntaxError |
“Unexpected answer” |
The journey you have completed
This is the last lesson of the Asynchronous JavaScript section. Look at how far you came, and how each lesson solved a problem that the one before it created:
| Lesson | The big idea |
|---|---|
| Synchronous vs asynchronous | One slow task blocks everything, so start slow work and move on |
| Timers | setTimeout and setInterval are the simplest async tools |
| Asynchronous callbacks | Callbacks get the result later, but nest deeply and are easy to misuse |
| The event loop | The call stack, the browser’s helpers and the queue explain how it works |
| Promises | A value for later: flat chains, one .catch, settled once |
| Promise combinators | Many Promises at once: all, allSettled, race, any |
async/await |
Promise code that reads like normal code |
| Microtasks and macrotasks | Two queues decide the exact order |
| HTTP and REST | The language that browsers and servers speak |
| The Fetch API | Real requests, with checking, states and helpers |
| AbortController | Stopping work that is no longer needed |
You can now read, write and debug the asynchronous code behind almost every modern website.
Common mistakes
- Reusing an aborted controller. It stays aborted, and the next request fails at once. Make a new one for each request.
- Showing an error for
AbortError. It is on purpose. Ignore it. - Forgetting to pass
{ signal }tofetch. Without it,abort()has nothing to stop. - Letting the old request’s
finallyupdate the screen. Checkcontroller === currentfirst. - Using
Promise.racefor a timeout and thinking the request stopped. It did not. UseAbortSignal.timeout. - Not clearing a manual timeout timer. Put
clearTimeoutinfinally. - Assuming an aborted
POSTwas not processed. The server may have finished it. Check before you retry. - Aborting without a reason when you have several causes. Pass a reason, or use
AbortSignal.timeout, so yourcatchcan tell the causes apart. - Using
AbortSignal.anywithout checking support. Older browsers do not have it. - Forgetting to clean up when a screen closes. Requests and listeners keep running. Use one controller and call
abort()when the screen closes.
Practice
- Start a
fetchand abort it after 50 ms. Printerror.nameanderror.message. Then run the same request without aborting, and compare. - Create a controller. Print
signal.abortedbefore and afterabort(). Add anabortevent listener to the signal and watch it fire. - Prove that a controller cannot be reused: call
abort(), then use the same signal for a secondfetch. How fast does it fail? Fix it with a new controller. - Call
controller.abort(new Error("User left the page"))and print the error message in yourcatch. How is it different from the default? - Build a page with Start and Cancel buttons for a request. Use the DevTools Slow 4G throttling to make it slow, then cancel it. What do you see in the Network panel?
- Build a search box that cancels the previous request on every new one and ignores
AbortError. Type quickly and look at the Network panel. How many requests are marked as cancelled? - Add a loading flag to your search box. First write the wrong version (
finally { loading = false }) and see the bug, then fix it withcontroller === current. - Use
AbortSignal.timeout(2000)on a slow request, and show a different message forTimeoutErrorand forAbortError. - Write your own
wait(ms, signal)from memory, and use it to build a countdown (3, 2, 1, Go!) that you can cancel with a button. - Write
openPanel()andclosePanel()with one controller that stops two requests and one event listener. Prove that all three stop. - Challenge: Write
getJson(url, { timeoutMs, signal })that combines the user’s signal and a timeout, usingAbortSignal.any, and also write a fallback that works without it. - Challenge: Send a
POSTto a practice server, cancel it, and then use aGETto check whether it was saved. Explain why you should check before retrying. - Challenge: Compare the
Promise.racetimeout and theAbortSignal.timeoutversion. Explain, in your own words, what the server sees in each case.
Recap
- An
AbortControlleris a stop switch. Itssignalis the wire you give to the work. Callingabort()stops everything that holds the wire. - Pass the signal to
fetchwith{ signal: controller.signal }. When you abort, the Promise rejects with anAbortError. Treat it as on purpose, not as a failure. - A signal has
aborted,reasonand anabortevent. You can abort with your own reason. - The switch works once. Create a new
AbortControllerfor every new request. - Aborting also stops reading the response body.
- In a search box, abort the previous request when a new one starts. In
finally, only the current request may change the screen state. AbortSignal.timeout(ms)gives a real timeout (TimeoutError) that closes the connection.Promise.raceonly stops waiting.AbortSignal.anycombines several signals.- One controller can stop many things at once: requests, event listeners and your own functions. Make your functions cancellable by listening to the
abortevent and callingclearTimeout. - Aborting does not undo work the server has already started. Be careful with
POST,PUTandDELETE.
Congratulations, you have completed the Asynchronous JavaScript section. You understand how JavaScript waits without freezing, how fetch talks to servers, and how to control all of it. Next, you will begin the OOP and Advanced JavaScript section, where you will learn how this really works, and then objects, prototypes and classes. You have already used a little of them (class HttpError extends Error), and soon you will understand every word.
If you want to revisit the basics, read the Fetch API lesson, the Promise combinators lesson, the event listeners lesson and the timers lesson.
Frequently asked questions
What is an AbortController?
It is a built-in tool for cancelling asynchronous work. You create it, pass controller.signal to something like fetch, and call controller.abort() when you want to stop the request.
What happens to a fetch request when I abort it?
The Promise rejects with an AbortError, and the browser stops the request and its download. Catch it and check error.name === "AbortError", so you can tell a cancel from a real failure.
Can I reuse an AbortController after aborting?
No. Once aborted, its signal stays aborted, so new requests with it fail at once. Create a new AbortController for each request, or each group of requests you want to cancel together.
How do I add a timeout to a fetch request?
Start a timer with setTimeout(() => controller.abort(), 5000), pass the signal to fetch, and clear the timer when the request finishes. Modern browsers also offer AbortSignal.timeout(5000) as a shortcut.
Why use AbortController in a search box?
When the visitor types quickly, older requests may finish after newer ones and show wrong results. Aborting the previous request before sending a new one means only the latest search is used.
See also: HTTP and REST Basics, The Event Loop, URL and URLSearchParams, JavaScript Cheat Sheet