JavaScript Fetch API: GET, POST, Headers and Error Handling
Learn the JavaScript Fetch API step by step: GET and POST requests, JSON bodies, headers, response.ok, error handling, loading states and real examples.
What you will learn
This is the lesson that the whole Asynchronous JavaScript section has been leading to. Every real website talks to a server, and in modern JavaScript the tool for that job is the Fetch API. You will use fetch in almost every project you build.
You have already seen small pieces of it in earlier lessons. Now you will learn it properly and write real code. By the end, you will know how to:
- send a GET request and read the JSON answer
- understand why you need two
awaits - check
response.okand tell the three kinds of failure apart - send data with POST, PUT, PATCH and DELETE
- send FormData and use headers such as
Authorization - build safe URLs with query strings
- show loading, error, empty and success states
- avoid the classic “old answer arrives late” bug in a search box
- run many requests together, and add a timeout
Everything you learned comes together
fetch is not a new idea. It is the place where all the earlier lessons work together. Look at what each lesson gave you:
| Earlier lesson | What it gives fetch |
|---|---|
| Promises | fetch(...) returns a Promise |
| async/await | The clean way to write it: await fetch(...) |
| Event loop | The browser does the waiting, so the page never freezes |
| HTTP and REST | Methods, URLs, headers, status codes and what they mean |
| JSON | The usual body format: JSON.stringify and .json() |
| URL and URLSearchParams | Building safe URLs with query strings |
| Error handling | try...catch...finally and custom errors |
| Promise combinators | Promise.all, allSettled and race for many requests |
| Timers | Debounce and timeouts |
| FormData | Sending forms and files |
So the new thing you learn here is small: the exact shape of fetch. The rest you know already.
The idea: the parcel and the delivery slip
Think of fetch as ordering something from the library, which sends your order by parcel. When the parcel arrives, two things happen in two steps:
- First the delivery slip arrives. It is the paper stuck on the outside. It tells you the status (delivered, wrong address, damaged…) and some headers (what is inside, how big it is). You can read it right away.
- Then you open the box. The real content, the body, is inside. Opening takes a moment, and you can open a box only once.
That is exactly how fetch works:
| The parcel | fetch |
|---|---|
| The delivery slip arrives | const response = await fetch(url) |
| Reading the slip | response.status, response.ok, response.headers |
| Opening the box | const data = await response.json() |
| A box can be opened only once | The body can be read only once |
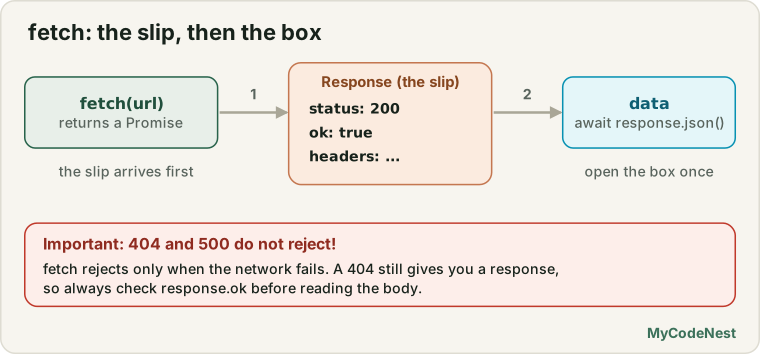
This is why a fetch call needs two awaits. The first gets the response (status and headers). The second reads the body, because a body can be large and may arrive in pieces.
Your first GET request
async function loadUser() {
  const response = await fetch("https://jsonplaceholder.typicode.com/users/1");

  console.log("status:", response.status);                    // 200
  console.log("ok:", response.ok);                            // true
  console.log("type:", response.headers.get("content-type")); // application/json; charset=utf-8

  const user = await response.json();
  console.log(user.name);
}

loadUser();
In the examples of this lesson, BASE stands for the base address of the practice API, so we do not repeat it everywhere:
const BASE = "https://jsonplaceholder.typicode.com";Follow it step by step:
fetch(url)sends aGETrequest. By default,fetchusesGET, so you do not need to say it.awaitwaits (the function waits, not the page) until the response headers arrive. You get aResponseobject.- You read the slip:
response.status,response.okandresponse.headers. await response.json()reads the body and turns the JSON text into a JavaScript object.
What is inside a Response?
| Property or method | What it gives you |
|---|---|
response.status |
The status code, like 200 or 404 |
response.ok |
true for any status from 200 to 299, otherwise false |
response.headers.get("name") |
The value of one response header |
response.url |
The final URL (after any redirects) |
await response.json() |
The body, parsed as JSON |
await response.text() |
The body as plain text (for HTML, plain text, or when you are not sure) |
await response.blob() |
The body as a file-like object (for images, PDFs and downloads) |
All three body methods return Promises, so you always need await.
A body can be read only once
Remember the box: once it is open, it is open. If you try to read the same body twice, you get an error:
const response = await fetch(BASE + "/users/1");

await response.json();       // fine, the first read
await response.json();       // TypeError: Body is unusable: Body has already been read
(The exact wording of the message depends on the browser, but it always says that the body was already read.)
If you really need the body twice, make a copy before reading with response.clone():
const copy = response.clone();

const data = await response.json();   // read one copy as JSON
const text = await copy.text();       // read the other copy as text
The most important rule: check response.ok
In the HTTP lesson you learned that fetch does not treat a 404 or a 500 as an error. It only rejects when there is a network failure. This means that there are three different kinds of failure, and you must handle them all:
| Kind of failure | What happens in fetch |
How you detect it |
|---|---|---|
| 1. Network problem (offline, wrong domain, server not reachable, blocked by CORS) | The Promise rejects with a TypeError |
catch block |
2. HTTP error (404, 401, 500…) |
The Promise is fulfilled, but response.ok is false |
if (!response.ok) |
| 3. Bad body (the server sent something that is not valid JSON, or an empty body) | response.json() throws a SyntaxError |
catch block |
Here is one function that handles all three. It was tested against a practice server, and the results are shown in the comments:
async function load(path) {
  try {
    const response = await fetch(BASE + path);

    if (!response.ok) {
      return "HTTP problem: status " + response.status;   // kind 2
    }

    const data = await response.json();
    return "OK: " + JSON.stringify(data);
  } catch (error) {
    if (error instanceof SyntaxError) {
      return "Bad JSON: " + error.name;                   // kind 3
    }
    return "Network problem: " + error.name;              // kind 1
  }
}

// load("/users/1")    -> OK: {"id":1,"name":"Riya Sharma", ...}
// load("/users/999")  -> HTTP problem: status 404
// load("/bad")        -> Bad JSON: SyntaxError   (the server sent plain text)
// server not running  -> Network problem: TypeError
A reusable helper
You will write the same three lines in every request, so put them in one helper and use it everywhere. This helper throws an error when the status is not 2xx, so the rest of your code can just use try...catch:
class HttpError extends Error {
  constructor(status) {
    super("The server answered with status " + status);
    this.name = "HttpError";
    this.status = status;
  }
}

async function requestJson(url, options) {
  const response = await fetch(url, options);

  if (!response.ok) {
    throw new HttpError(response.status);
  }

  if (response.status === 204) {
    return null;                  // 204 has no body, so there is nothing to parse
  }

  return await response.json();
}
The HttpError class uses the same pattern as the custom errors in the error handling lesson: extends Error, super(message) and this.name. (Classes are explained in the OOP section. For now, copy the pattern.) The extra status property lets the code that uses the helper decide what to do:
try {
  const user = await requestJson(BASE + "/users/999");
  console.log(user.name);
} catch (error) {
  if (error instanceof HttpError && error.status === 404) {
    console.log("That user does not exist.");
  } else if (error instanceof HttpError) {
    console.log("Server problem: " + error.status);
  } else {
    console.log("Network problem: " + error.message);
  }
}
The 204 line matters, too. A 204 No Content response has an empty body. Calling .json() on an empty body throws a SyntaxError, so check for it first.
Building the URL: query strings
Never glue user input into a URL by hand. Use the URL object from the URL lesson, which encodes special characters for you:
const url = new URL("/users", BASE);
url.searchParams.set("city", "Delhi");
url.searchParams.set("note", "New Delhi & more");
console.log(url.search); // ?city=Delhi¬e=New+Delhi+%26+more
const response = await fetch(url); // fetch accepts a URL objectThe & inside the note was turned into %26, so it could not break the query string. If you had joined the text yourself, the & would have started a new, wrong parameter.
If your URL starts with a / and has no domain, like fetch("/api/users"), fetch sends the request to the same website that served your page. This is what you saw in the FormData lesson.
The options object
The second argument of fetch is an options object. It describes everything that is not the URL:
fetch(url, {
  method: "POST",
  headers: { "Content-Type": "application/json" },
  body: JSON.stringify(data)
});| Option | What it does | Default |
|---|---|---|
method |
The HTTP method | "GET" |
headers |
An object of request headers | none |
body |
The data to send (not with GET) |
none |
There are other options, such as credentials, cache and signal. You will meet signal in the next lesson, where you learn to cancel a request.
Sending data: POST, PUT, PATCH and DELETE
Every method follows the same recipe. You change the method, and when you send data you add the Content-Type header and a body made with JSON.stringify. Because the code is almost the same each time, one small helper does it all:
async function request(method, path, body) {
  const options = { method: method };

  if (body !== undefined) {
    options.headers = { "Content-Type": "application/json" };
    options.body = JSON.stringify(body);
  }

  const response = await fetch(BASE + path, options);
  return { status: response.status, data: await response.json() };
}
Now each action is one line. Here is what a practice server answered:
await request("POST", "/posts", { title: "Hi" });
// { status: 201, data: { id: 101, receivedContentType: "application/json", title: "Hi" } }

await request("PUT", "/posts/1", { title: "Replaced" });
// { status: 200, data: { method: "PUT", id: 1, title: "Replaced" } }

await request("PATCH", "/posts/1", { title: "Fixed" });
// { status: 200, data: { method: "PATCH", id: 1, title: "Fixed" } }

await request("DELETE", "/posts/1");
// { status: 200, data: {} }
Look at receivedContentType: "application/json" in the POST answer. It proves that the header you set really arrived at the server. If you forget the header, the server may not understand your body.
The two things people forget most often:
JSON.stringify. The body must be text. A plain object would be sent as the useless text"[object Object]".Content-Type: application/json. Without it, the server does not know the body is JSON.
Sending FormData
In the FormData lesson, you learned to collect form fields into a FormData object. You can give it directly as the body, with no JSON.stringify:
const formData = new FormData();
formData.append("username", "riya");

const response = await fetch(BASE + "/upload", {
  method: "POST",
  body: formData          // no Content-Type header here!
});
Do not set Content-Type yourself. The browser sets multipart/form-data and adds a special boundary that separates the fields. If you write the header by hand, the boundary is missing and the upload breaks. A test against a practice server confirmed that the server received multipart/form-data, with a boundary, and the field username.
Headers and authentication
Remember the member card from the HTTP lesson? You show it in the Authorization header on every request:
// No token: the server says 401
const noToken = await fetch(BASE + "/private");
console.log(noToken.status);    // 401

// With a token: the server says 200
const withToken = await fetch(BASE + "/private", {
  headers: { Authorization: "Bearer abc123" }
});
console.log(withToken.status);  // 200
The token normally comes from a login request (POST /login). Keep it in a variable while the page is open. Do not hard code real secret keys in your front-end code, because anyone can read them in DevTools.
Real use case: a data screen with four states
Every screen that loads data from a server has four states, and a good page handles all of them:
| State | What the user should see |
|---|---|
| Loading | “Loading…” (and a disabled button) |
| Error | A clear message, with a way to try again |
| Empty | “No results found” (the request worked, but there is nothing to show) |
| Success | The data |
Here is the full pattern. It brings together async/await, try...catch...finally, the helper and the DOM:
const status = document.getElementById("status");
const list = document.getElementById("list");
const loadButton = document.getElementById("loadUsers");

loadButton.addEventListener("click", async function () {
  status.textContent = "Loading...";                 // 1. loading
  list.textContent = "";
  loadButton.disabled = true;

  try {
    const users = await requestJson(BASE + "/users");

    if (users.length === 0) {
      status.textContent = "No users found.";        // 3. empty
      return;
    }

    status.textContent = users.length + " users loaded";   // 4. success

    users.forEach(function (user) {
      const li = document.createElement("li");
      li.textContent = user.name + " (" + user.email + ")";
      list.append(li);
    });
  } catch (error) {
    if (error instanceof HttpError) {
      status.textContent = "Server problem: status " + error.status;   // 2. error
    } else {
      status.textContent = "Network problem: " + error.message;
    }
  } finally {
    loadButton.disabled = false;                     // always runs
  }
});
Notice how this code reads from top to bottom, like a story. The event handler is an async function, so it can use await. The return inside the try still triggers finally, so the button is always enabled again.
Open the practice editor and click Load users. Then tick Use a wrong URL and click again, to see the error state. In the Network panel of DevTools you can watch every request, as you learned in the HTTP lesson.
Real use case: search as you type
A search box seems simple, but it hides one of the most famous bugs of async programming. The idea is to send a request when the user types. In the timers lesson, you learned debounce, which waits until the user pauses, so you do not send a request for every letter.
But even with debounce, there is a second problem. Imagine this:
- The user types
a. Request A is sent. The server is busy, so it takes 300 ms. - The user types
b(nowab). Request AB is sent. This one takes only 50 ms.
Request AB is newer, but it finishes first. Request A is older, but it finishes last. The older answer arrives late and overwrites the correct one. The user typed ab, but sees the results for a.
It is like ordering from two couriers. You send the first one, change your mind, and send a second one. The first courier is stuck in traffic, but arrives later, and you accept the wrong parcel.
Here is the bug, in a test:
const shown = [];

async function naiveSearch(q) {
  const response = await fetch(BASE + "/search?q=" + q);
  const data = await response.json();
  shown.push(data.q);     // pretend this updates the screen
}

await Promise.all([naiveSearch("a"), naiveSearch("ab")]);
console.log(shown.join(" then "));   // ab then a   <-- the screen ends showing "a"
The fix is to give every request a number, and to ignore the answer if a newer request was started in the meantime:
let latest = 0;

async function safeSearch(q) {
  latest++;
  const mine = latest;                      // my own number, stored by a closure

  const response = await fetch(BASE + "/search?q=" + q);
  const data = await response.json();

  if (mine !== latest) {
    return;                                 // a newer search exists, ignore this old answer
  }

  console.log("Showing results for: " + data.q);
}

await Promise.all([safeSearch("a"), safeSearch("ab")]);
// Showing results for: ab
Now only the newest search is allowed to update the screen. In the next lesson, you will see an even better way: cancelling the old request.
Real use case: many requests together
You learned in the combinators lesson that independent tasks should run together. This is even more important with network requests, because each one is slow. In a test where each request took 0.3 seconds:
// One by one: about 0.6 seconds
await fetch(BASE + "/delay300");
await fetch(BASE + "/delay300");

// Together: about 0.3 seconds
await Promise.all([fetch(BASE + "/delay300"), fetch(BASE + "/delay300")]);
For a dashboard where one failing widget must not break the others, use Promise.allSettled:
const results = await Promise.allSettled([
  requestJson(BASE + "/users/1"),
  requestJson(BASE + "/users/999")    // this one fails with a 404
]);

console.log(results.map((r) => r.status).join(", "));   // fulfilled, rejected
Then show the successful parts and an error message for the failed ones, exactly as in the combinators lesson.
Real use case: a timeout
A request to a slow server can hang for a very long time. In the combinators lesson, you built a timeout with Promise.race. It works well with fetch:
function timeout(ms) {
  return new Promise((_, reject) => {
    setTimeout(() => reject(new Error("Timed out after " + ms + " ms")), ms);
  });
}

try {
  const response = await Promise.race([fetch(BASE + "/slow"), timeout(300)]);
  console.log("Status:", response.status);
} catch (error) {
  console.log(error.message);   // Timed out after 300 ms
}
There is one honest limit. As you learned, the losing Promise is not cancelled. The slow request keeps running in the background and still uses the network. To really stop a request, you need the AbortController, and that is the topic of the next lesson.
Common mistakes
- Forgetting
awaitonresponse.json(). You get a Promise instead of data, anddata.nameisundefined. - Thinking
fetchrejects on404or500. It does not. Checkresponse.ok. - Not handling network errors. Without
try...catch, an offline user gets an unhandled rejection and a stuck “Loading…” message. - Reading the body twice. It throws an error. Use
response.clone()if you need two copies. - Calling
.json()on an empty body. A204response has no body, so.json()throws. Check the status first. - Forgetting
JSON.stringifywhen sending JSON, or forgetting theContent-Type: application/jsonheader. - Setting
Content-Typeby hand withFormData. The browser must set it, because of the boundary. - Using
GETwith abody.GEThas no body. Use a query string. - Gluing user input into URLs by hand. Use
URLandsearchParams, so special characters are encoded. - Not showing a loading state, or not re-enabling the button. Use
try...catch...finally. - Sending a request for every key press. Use debounce, and ignore old answers.
- Awaiting independent requests one by one. Use
Promise.all. - Putting secret keys in front-end code. Anyone can read them.
- Forgetting CORS. A network error with no status code can mean the server does not allow your site. The server must fix it.
Practice
- Fetch
https://jsonplaceholder.typicode.com/users/1and print itsname,emailand the status. Then change the URL to/users/999and print the status andresponse.ok. Does your code throw? - Print the
content-typeheader of a response. Then useresponse.text()instead ofresponse.json()and print the first 100 characters. - Write
getUser(id)that returns the user, but throws an error with a clear message when the status is not2xx. Test it with an id that exists and one that does not. - Use your
requestJsonhelper in atry...catchthat prints three different messages: for a404, for other HTTP errors, and for network errors. (To test a network error, turn off your internet or use a wrong domain.) - Build the URL
https://jsonplaceholder.typicode.com/posts?userId=1withnew URLandsearchParams, and fetch it. How many posts did you get? - Send a
POSTrequest that creates a post, and print theidthat the server returns. - Send a
PATCHrequest that changes only the title of a post. Which method would you use to replace the whole post? - Try to read a response body twice. Read the error. Then fix it with
response.clone(). - In the practice editor, click Load users, then tick Use a wrong URL and click again. Open the Network panel and compare the two requests. What status did the wrong URL give?
- Create a page with a button Load posts that shows the four states (loading, error, empty and success) for the list of posts from
/posts?userId=1. - Load a user and their posts together with
Promise.all, and show both. Measure the time and compare it with loading them one by one. - Challenge: Build a search box that uses debounce and the latest number trick, so that old answers never overwrite new ones. Test it with a very fast typist (type quickly).
- Challenge: Write
fetchWithTimeout(url, ms)withPromise.race. What is its limit, and what will you use to fix it? - Challenge: Write
postJson(path, data)andgetJson(path)on top ofrequestJson, and use them to build a tiny notes app with the JSONPlaceholder API.
Recap
fetch(url, options)sends a request and returns a Promise of a Response. Use it withasync/await.- A response arrives in two steps: first the slip (
status,ok,headers), then the box. You open the box withawait response.json(),.text()or.blob(). A body can be read only once (useclone()for a second copy). - There are three kinds of failure: a network problem (the Promise rejects), an HTTP error (
response.okisfalse) and a bad or empty body (.json()throws). Handle all three. - Put the checking code in one helper, like
requestJson, that throws anHttpErrorfor a bad status and returnsnullfor a204. - Build URLs with
URLandsearchParams. Send data withmethod,headers: { "Content-Type": "application/json" }andbody: JSON.stringify(data). - For FormData, give it as the
bodyand let the browser set theContent-Type. - Send credentials in the
Authorizationheader, and never hard code secrets in front-end code. - Every data screen has four states: loading, error, empty and success. Use
try...catch...finally. - In a search box, use debounce and ignore old answers with a request number.
- Use
Promise.allorallSettledfor independent requests, andPromise.racefor a timeout. A timeout does not cancel the request, and the next lesson shows how to do that.
Next, you will learn the AbortController: how to really cancel a request, either because the user left, because a newer search started, or because it took too long.
If you want to refresh the foundations, read the HTTP and REST basics lesson, the async/await lesson, the Promise combinators lesson and the FormData lesson.
Frequently asked questions
Why does fetch not reject on a 404 or 500 error?
fetch only rejects when the request itself fails, for example no network. A 404 or 500 is still a response. Check response.ok (or response.status) and throw an error yourself when it is false.
What is the difference between response.json() and response.text()?
json() reads the body and parses it as JSON into a JavaScript value. text() returns the body as a plain string. Both return a Promise, and you can only read the body once.
How do I send JSON with fetch?
Use method: "POST", set the header "Content-Type": "application/json", and pass body: JSON.stringify(data). The server then knows that the body is JSON, and can parse it.
What is CORS, and why do I see a CORS error?
CORS is a browser security rule that blocks a page from reading responses from another origin unless that server allows it with special headers. You fix it on the server by sending the right Access-Control-Allow-Origin header.
Should I use fetch or a library such as Axios?
fetch is built into browsers and is enough for most projects. Libraries such as Axios add conveniences, like automatic JSON handling and error throwing. Start with fetch, and add a library only if you need those extras.
See also: AbortController, Forms and Validation, localStorage and sessionStorage, JavaScript Cheat Sheet