Form Actions and useActionState in React 19
Master React 19 form actions and useActionState: handle async submissions, pending states, optimistic updates, and form resetting without manual state.
What you will learn
In earlier lessons, you built forms using controlled inputs and managed async submission with useEffect and fetch. You had to maintain multiple state variables manually: const [name, setName] = useState(''), const [isPending, setIsPending] = useState(false), and const [error, setError] = useState(null).
React 19 revolutionises form handling by turning standard HTML <form> elements into first-class async containers using Actions and the new hook useActionState.
In this lesson, you will learn:
- What a React 19 Action is and how it differs from traditional
onSubmithandlers. - How to pass async functions directly to the
<form action={...}>prop. - How to manage submission state, return values, and pending transitions with
useActionState. - How native browser
FormDataeliminates repetitive controlled input boilerplate. - How to handle server errors cleanly and reset form fields after a successful submission.
What is a React Action?
In React 19, an Action is an asynchronous transition function that automatically tracks pending state and handles error boundaries.
Historically, when handling a form submission, you had to call event.preventDefault() to stop the browser from refreshing the page:
// The traditional pre-React 19 way
function OldContactForm() {
  const [loading, setLoading] = useState(false);
  const [error, setError] = useState(null);

  async function handleSubmit(event) {
    event.preventDefault(); // Stop native page reload
    setLoading(true);
    setError(null);
    try {
      await sendContactMessage(new FormData(event.target));
    } catch (err) {
      setError(err.message);
    } finally {
      setLoading(false);
    }
  }

  return (
    <form onSubmit={handleSubmit}>
      <input name="email" type="email" required />
      <button type="submit" disabled={loading}>
        {loading ? "Sending..." : "Send Message"}
      </button>
      {error && <p className="error">{error}</p>}
    </form>
  );
}
Notice how much ceremony is required just to send an HTTP request and show a loading spinner. In React 19, the <form> element accepts a function in its native action attribute:
// The React 19 Action way
function ModernForm() {
  async function updateProfile(formData) {
    const username = formData.get("username");
    await saveUsernameToApi(username);
  }

  return (
    <form action={updateProfile}>
      <input name="username" defaultValue="alex" />
      <button type="submit">Save</button>
    </form>
  );
}
When you pass a function to <form action={...}>:
- React automatically intercepts the submit event—you do not call
event.preventDefault(). - React executes the function inside a
startTransition, ensuring your UI remains responsive while the async operation completes. - React automatically extracts native browser
FormDataand delivers it as the first parameter to your function. - When the action finishes successfully, React can automatically reset uncontrolled form fields.
Introducing useActionState
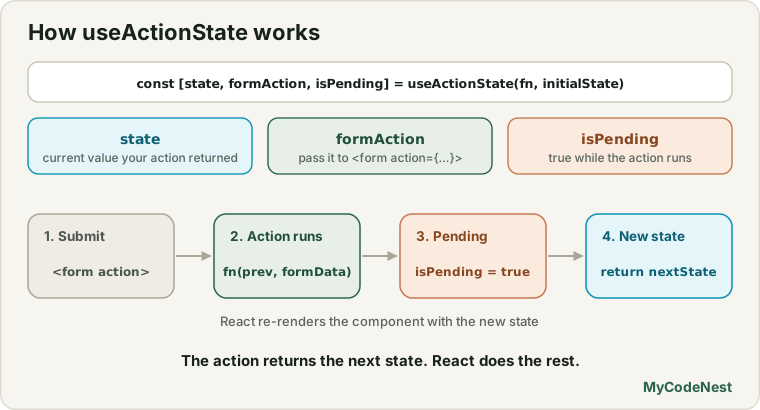
While <form action={fn}> handles the submission, apps almost always need to know:
- Is the form currently submitting (
isPending)? - What was the result of the submission (e.g., success message or validation errors)?
- What is the previous state?
React 19 provides the useActionState hook (which replaces the temporary canary hook formerly known as useFormState):
import { useActionState } from 'react';

const [state, formAction, isPending] = useActionState(fn, initialState, permalink?);
Let’s break down the three parts:
fn: The action function to execute. It receives(previousState, formData)as arguments and returns thenextState.initialState: The starting value ofstatebefore any action runs (e.g.,nullor{ error: null }).state: The current value returned by your action function.formAction: A wrapped action handler passed to<form action={formAction}>or<button formAction={formAction}>.isPending: A boolean that istruewhile the async action is executing.
Step-by-Step Example: Feedback Form
Let’s build a real feedback submission form with validation and pending states using useActionState.
1. Define the action function
Your action function takes two arguments: (previousState, formData). It reads form fields using standard formData.get('fieldName'):
// feedbackAction.js
export async function submitFeedbackAction(previousState, formData) {
  const name = formData.get("name")?.trim();
  const feedback = formData.get("feedback")?.trim();

  // Basic validation
  if (!name || name.length < 2) {
    return {
      success: false,
      error: "Please enter a valid name (at least 2 letters).",
    };
  }

  if (!feedback || feedback.length < 10) {
    return {
      success: false,
      error: "Feedback message must be at least 10 characters long.",
    };
  }

  try {
    // Simulate API call (like the fakeServer in Project 4)
    await new Promise((resolve) => setTimeout(resolve, 1000));

    return {
      success: true,
      error: null,
      message: `Thank you, ${name}! Your feedback was received.`,
    };
  } catch (err) {
    return {
      success: false,
      error: "Network error. Please try submitting again.",
    };
  }
}
2. Connect the action to your component
Now connect submitFeedbackAction to your component using useActionState:
// FeedbackForm.jsx
import { useActionState } from 'react';
import { submitFeedbackAction } from './feedbackAction.js';

export function FeedbackForm() {
  const [state, formAction, isPending] = useActionState(submitFeedbackAction, {
    success: false,
    error: null,
  });

  return (
    <div className="feedback-card">
      <h2>Send Feedback</h2>

      {state.success && (
        <div className="alert alert-success" role="alert">
          {state.message}
        </div>
      )}

      {state.error && (
        <div className="alert alert-error" role="alert">
          {state.error}
        </div>
      )}

      <form action={formAction}>
        <div className="form-group">
          <label htmlFor="name">Your Name</label>
          <input
            id="name"
            name="name"
            type="text"
            placeholder="Ada Lovelace"
            disabled={isPending}
            required
          />
        </div>

        <div className="form-group">
          <label htmlFor="feedback">Your Message</label>
          <textarea
            id="feedback"
            name="feedback"
            rows="4"
            placeholder="Tell us what you think..."
            disabled={isPending}
            required
          ></textarea>
        </div>

        <button type="submit" disabled={isPending} className="submit-btn">
          {isPending ? "Submitting..." : "Send Feedback"}
        </button>
      </form>
    </div>
  );
}
Notice what is missing in this code:
- No
useStateforname. - No
useStateforfeedback. - No
useStateforisPending. - No
useStateforerror. - No
event.preventDefault().
React manages the submission lifecycle seamlessly.
Form Resetting Behaviour in React 19
In HTML, uncontrolled <input> elements retain their values unless reset. In React 19:
- If a
<form action={...}>finishes an action and the action succeeds, React automatically clears uncontrolled input fields if no state bound them. - If you need explicit form reset programmatic control, you can pass native form reset or use the
keyprop pattern learned in Component Identity.
For example, when state.success becomes true, you can reset the form simply by changing its key:
<form key={state.success ? "submitted" : "fresh"} action={formAction}>
  ...
</form>
When the key changes, React treats the form as a new component instance, wiping all input fields cleanly without any manual DOM manipulation.
Button Actions (formAction)
In complex workflows, a form may have multiple actions. For instance, a blog editor might have a “Save Draft” button and a “Publish” button.
React 19 supports formAction directly on <button> and <input type="submit">:
function PostEditor({ post }) {
  async function saveDraftAction(formData) {
    const title = formData.get("title");
    await api.saveDraft({ title });
  }

  async function publishAction(formData) {
    const title = formData.get("title");
    await api.publishPost({ title });
  }

  return (
    <form>
      <input name="title" defaultValue={post.title} />
      <textarea name="content" defaultValue={post.content} />

      {/* Triggers saveDraftAction */}
      <button type="submit" formAction={saveDraftAction}>
        Save Draft
      </button>

      {/* Triggers publishAction */}
      <button type="submit" formAction={publishAction}>
        Publish Now
      </button>
    </form>
  );
}
The button you click determines which action function receives the FormData.
Common mistakes
1. Calling event.preventDefault() inside an action
Actions receive (previousState, formData), not an event object. If you write event.preventDefault(), your app throws a TypeError: Cannot read properties of undefined (reading 'preventDefault').
2. Forgetting the name attribute on inputs
Native FormData uses the input’s name attribute as its key (formData.get("username")). If you write <input id="username" /> without name="username", formData.get("username") returns null.
3. Mutating the previous state parameter
Just like reducers in useReducer, your action function must be a pure transition function returning new state, never mutating previousState.
4. Confusing useActionState with useState
useActionState takes the action function as its first argument, and initial state as the second:
// Wrong
const [state, action] = useActionState(initialState, actionFunction);

// Correct
const [state, action, isPending] = useActionState(actionFunction, initialState);
Practice
- Convert a simple login form with
emailandpasswordfromuseState+onSubmitinto a React 19useActionStateform. - In the action function, validate that the email includes an
@symbol. If not, return{ error: 'Invalid email' }and display it in red. - Add a simulated delay of
1500msusingsetTimeoutinside your action, and verify that the submit button shows"Logging in..."and disables whileisPendingistrue. - Build a form with two submit buttons: “Save to Cart” and “Buy Now”. Use the
formActionprop on the buttons to handle them with separate action functions. - Create a counter component where clicking “Increment” runs an async action that adds 1 to state after 500ms using
useActionState. - Test what happens when an input has no
nameattribute. Useconsole.log(Array.from(formData.entries()))inside the action to verify what data is collected.
Recap
- React Actions are async transition functions passed to
<form action={...}>or<button formAction={...}>. - Actions automatically intercept submission without needing
event.preventDefault(). - The action function automatically receives standard browser
FormData. useActionStatereturns[state, formAction, isPending]. It executes the action, receives(prevState, formData), and updates the component with the return value.- Uncontrolled inputs paired with
nameattributes eliminate state synchronization boilerplate. - Next, you will learn how child components inside a form can read submission status and optimistic updates using
useFormStatusanduseOptimistic.
Frequently asked questions
Can I still use controlled inputs with React 19 Actions?
Yes. Actions and controlled inputs work together seamlessly. If you have an input that requires real-time masking or formatting as the user types (like a credit card number), keep it controlled with value and onChange. When the form is submitted via <form action={...}>, FormData will still capture its current value correctly.
What is the difference between useActionState and useFormState?
useFormState was the temporary name used during React 19 canary releases. In the official stable React 19 release, it was renamed to useActionState because actions can be used for any async transition, not just <form> tags.
Does useActionState work without JavaScript (Progressive Enhancement)?
If you are using a server-rendering framework (like Next.js or Remix) with Server Actions, <form action="..."> can submit to the server even before client JavaScript hydrates. In a single-page app (Vite/CSR), React executes the action in the browser.
How do I clear input fields after useActionState succeeds?
The cleanest way is to use a dynamic key on the <form> element (for example, key={state.submittedAt}). When the key updates, React remounts the form elements to their default values without manual DOM resets.
How do I upload files using React Actions?
Native browser FormData supports file inputs out of the box! Give your input type="file" and a name="avatar". In your action function, read formData.get("avatar"), which will be a standard File object ready to be sent to your storage API.
See also: Project 4: Multi-Page Notes App, Controlled Inputs, useReducer in React