React Router: Loading Data and Protecting Routes
Protect routes in React Router with a RequireAuth layout, redirect to login and back, and get a first look at loader functions in data mode.
What you will learn
Two things almost every real app needs from its router:
- Protected routes: pages such as a dashboard or an account page that only logged-in users may see. Everyone else is sent to the login page, and after logging in, they land on the page they wanted.
- Loading data for a page: so that a page’s data is requested as soon as the user navigates, and the page has a clear loading and error story.
You will learn the standard way to build protected routes in declarative mode, step by step, and a very important warning about what route protection does not do. Then you will get a short preview of loaders, the data-loading feature of React Router’s data mode.
You should know React Router basics, nested routes and React Context.
Protected routes
Imagine our site has two private pages, /dashboard and /account. Our plan:
Logged out user opens /account
   → sees the login page (the address becomes /login)
   → logs in
   → lands on /account, the page they originally wanted
For this we need three things: some login state, a guard that checks it, and a login page that returns the user to where they came from.
Step 1: the login state
The real login lesson comes next. For now, we use the small AuthProvider from the context lesson, which only remembers a name. Create src/auth/AuthContext.jsx:
import { createContext, useContext, useState } from 'react';

const AuthContext = createContext(null);

export function AuthProvider({ children }) {
  const [user, setUser] = useState(null);

  const value = {
    user,
    login: (name) => setUser({ name }),
    logout: () => setUser(null),
  };

  return <AuthContext value={value}>{children}</AuthContext>;
}

export function useAuth() {
  const context = useContext(AuthContext);
  if (context === null) {
    throw new Error("useAuth must be used inside an AuthProvider");
  }
  return context;
}
user is null when nobody is logged in, and an object when somebody is. Put the provider inside the router in src/main.jsx:
import { StrictMode } from 'react'
import { createRoot } from 'react-dom/client'
import { BrowserRouter } from 'react-router'
import { AuthProvider } from './auth/AuthContext.jsx'
import './index.css'
import App from './App.jsx'

createRoot(document.getElementById('root')).render(
  <StrictMode>
    <BrowserRouter>
      <AuthProvider>
        <App />
      </AuthProvider>
    </BrowserRouter>
  </StrictMode>,
)
Step 2: the guard, RequireAuth
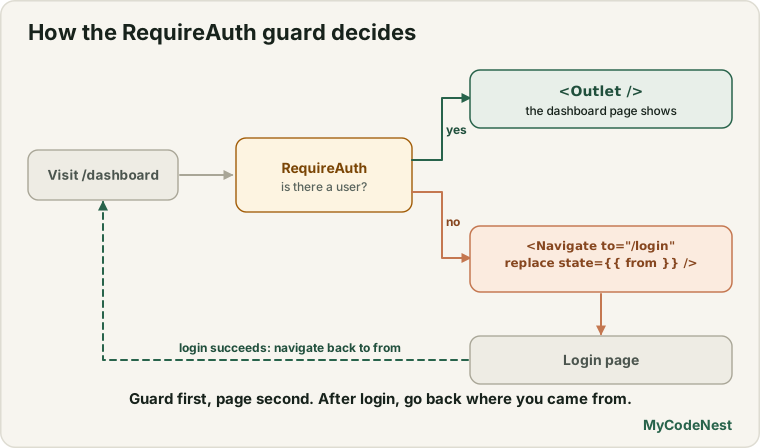
The guard is a layout route (like Layout from the last lesson) that decides whether to show its children. Create src/components/RequireAuth.jsx:
import { Navigate, Outlet, useLocation } from 'react-router';
import { useAuth } from '../auth/AuthContext.jsx';

function RequireAuth() {
  const { user } = useAuth();
  const location = useLocation();

  if (!user) {
    return <Navigate to="/login" replace state={{ from: location }} />;
  }

  return <Outlet />;
}

export default RequireAuth;
This is short, but every part matters:
- If there is no user, it renders
<Navigate to="/login" />, a redirect. replaceswaps the history entry, so the Back button does not return to the protected page, which would just redirect again and trap the user.state={{ from: location }}attaches a note to the navigation: “this user came from here”.Navigate(andLink, andnavigate()) can carry astateobject that is not shown in the URL. The login page will read it.- If there is a user, it renders
<Outlet />, so the protected child pages appear.
Step 3: the login page
Create src/pages/Login.jsx:
import { useState } from 'react';
import { useLocation, useNavigate } from 'react-router';
import { useAuth } from '../auth/AuthContext.jsx';

function Login() {
  const { login } = useAuth();
  const navigate = useNavigate();
  const location = useLocation();
  const [name, setName] = useState("");

  const from = location.state?.from?.pathname ?? "/dashboard";

  function handleSubmit(event) {
    event.preventDefault();
    if (name.trim() === "") {
      return;
    }
    login(name.trim());
    navigate(from, { replace: true });
  }

  return (
    <form onSubmit={handleSubmit}>
      <title>Log in | My Site</title>
      <h1>Log in</h1>
      <label htmlFor="name">Your name</label>
      <input id="name" value={name} onChange={(event) => setName(event.target.value)} />
      <button type="submit">Log in</button>
    </form>
  );
}

export default Login;location.state?.from?.pathnamereads the note from the guard. The?.(optional chaining) is needed, because a user who opens/logindirectly has no state.?? "/dashboard"gives a default destination.- After
login(...), we callnavigate(from, { replace: true }). Both state updates happen in the same event handler, so React applies them together, and the guard sees the new user when the page renders. Thereplacekeeps the login page out of the Back button history.
Step 4: two private pages and a status area
src/pages/Dashboard.jsx:
import { useAuth } from '../auth/AuthContext.jsx';

function Dashboard() {
  const { user } = useAuth();

  return (
    <>
      <title>Dashboard | My Site</title>
      <h1>Dashboard</h1>
      <p>Welcome, {user.name}!</p>
      <p>Quarterly numbers (hidden only by the client-side guard).</p>
    </>
  );
}

export default Dashboard;src/pages/Account.jsx:
import { useAuth } from '../auth/AuthContext.jsx';

function Account() {
  const { user } = useAuth();

  return (
    <>
      <title>Account | My Site</title>
      <h1>Account</h1>
      <p>Signed in as {user.name}.</p>
    </>
  );
}

export default Account;
It is safe to read user.name here: the guard guarantees that these pages are only rendered when user exists.
src/components/AuthStatus.jsx shows Log in or Log out in the menu:
import { NavLink } from 'react-router';
import { useAuth } from '../auth/AuthContext.jsx';

function AuthStatus() {
  const { user, logout } = useAuth();

  if (!user) {
    return <NavLink to="/login">Log in</NavLink>;
  }

  return (
    <span>
      <NavLink to="/dashboard">Dashboard</NavLink>{" "}
      <NavLink to="/account">Account</NavLink>{" "}
      Hi {user.name} <button onClick={logout}>Log out</button>
    </span>
  );
}

export default AuthStatus;
Add it to the menu in src/layouts/Layout.jsx: import it at the top (import AuthStatus from '../components/AuthStatus.jsx';), and place <AuthStatus /> right after the last NavLink inside the <nav>.
Notice that Log out only calls logout. We do not need to navigate anywhere ourselves. If the user is on a private page, the guard sees that user is null and sends them to the login page by itself. If they are on a public page, they simply stay there.
Hiding the Dashboard link from logged-out users is only a convenience. The guard is what actually blocks the page.
Step 5: add the routes
In src/App.jsx, import the new pages and the guard, and add a login route plus a guarded group:
import RequireAuth from './components/RequireAuth.jsx';
import Login from './pages/Login.jsx';
import Dashboard from './pages/Dashboard.jsx';
import Account from './pages/Account.jsx';
Inside the layout route, next to the other routes, add:
<Route path="login" element={<Login />} />
<Route element={<RequireAuth />}>
  <Route path="dashboard" element={<Dashboard />} />
  <Route path="account" element={<Account />} />
</Route>
<Route element={<RequireAuth />}> has no path: it is a pathless layout route whose only job is to guard its children. Any route you put inside it is protected. To protect a new page later, you just add it to this group.
What happens in the browser
We tested this exact code in a browser simulation. Try these steps:
- Logged out, open
/account. The address becomes/login. - Type a name and press Log in. You land on
/account, the page you first asked for, not the default dashboard. (Opening/logindirectly sends you to/dashboardinstead, because there is no savedfrom.) - The menu now shows Dashboard, Account and
Hi Aishawith a Log out button. - Press the browser’s Back button. You do not return to the login form, because we used
replace. - Click Log out while you are on a private page. The guard notices that there is no user any more and sends you to the login page. If you log out on a public page, such as the home page, you simply stay there. Open
/dashboardagain: you are sent to the login page. - Refresh the page while logged in. You are logged out again. The login state lives only in memory, so a reload resets it. The next lesson shows how to keep a session across reloads.
A very important warning
Route protection like this is a user experience feature, not security. Never rely on it to protect secrets. Here is why:
- All your React code, including the Dashboard component, is downloaded to every visitor’s browser as JavaScript files. A guard only decides what to render. It does not hide the code.
- Anyone can open the browser’s developer tools, read the code, change the
uservalue or edit the JavaScript.
We proved it. After building the project, we searched the built JavaScript file for the text inside the Dashboard page, and found it. A logged-out visitor can download that file and read the page.
So the rule is:
Anything that must stay private (data, actions, permissions) must be protected on the server. The server must check who is asking, and refuse to send private data to anyone who is not allowed. The route guard only makes the app pleasant (no pages that fail for logged-out users).
The security and authentication lessons explain how a real login works and what the server must check. In this lesson, the guard shows the pattern. The data in this example is not secret.
Loading data for a page: a preview of loaders
So far you load data inside components, with a Hook like useFetch. That works well, but it has one weakness: the request only starts after the page component has rendered. If a page contains a child that also loads data, that request starts only after the first one finishes. This is called a waterfall, and it makes pages slow.
React Router’s data mode offers another way: each route can have a loader, a function that loads the page’s data. The router calls it as soon as the user navigates, before the page renders, and gives the result to the page with the useLoaderData Hook. Data mode creates the router with createBrowserRouter and renders it with RouterProvider, instead of using BrowserRouter and Routes.
Here is a small, complete example. It is optional for this course: the declarative mode you used above is enough for many apps. Create src/DataRouterDemo.jsx:
import { createBrowserRouter, Link, Outlet, useLoaderData, useNavigation, useRouteError, isRouteErrorResponse } from 'react-router';
import { RouterProvider } from 'react-router/dom';
import { products } from './data/products.js';

function getProduct(id) {
  return new Promise((resolve) => {
    setTimeout(() => resolve(products.find((item) => item.id === Number(id)) ?? null), 100);
  });
}

async function productLoader({ params }) {
  const product = await getProduct(params.id);
  if (!product) {
    throw new Response("Not found", { status: 404 });
  }
  return product;
}

function Root() {
  const navigation = useNavigation();

  return (
    <>
      <nav>
        <Link to="/">Home</Link> <Link to="/products/1">Mouse</Link>{" "}
        <Link to="/products/99">Missing</Link>
      </nav>
      {navigation.state === "loading" && <p>Loading...</p>}
      <Outlet />
    </>
  );
}

function ProductPage() {
  const product = useLoaderData();

  return <h1>{product.name}</h1>;
}

function ErrorPage() {
  const error = useRouteError();
  const message = isRouteErrorResponse(error) ? `${error.status}: ${error.data}` : "Something went wrong";

  return <p role="alert">{message}</p>;
}

export const routes = [
  {
    path: "/",
    element: <Root />,
    errorElement: <ErrorPage />,
    children: [
      { index: true, element: <h1>Home</h1> },
      { path: "products/:id", loader: productLoader, element: <ProductPage /> },
    ],
  },
];

const router = createBrowserRouter(routes);

export default function DataRouterDemo() {
  return <RouterProvider router={router} />;
}
Let us read it:
- Routes are an object (an array of route objects) instead of JSX. The pieces are the same:
path,element,children,index. loaderis an async function that receives{ params }(the same URL parameters asuseParams). Whatever it returns becomes the page’s data. Here it waits for the (simulated) data.useLoaderData()returns that data inside the page. Notice there is no loading state inProductPage: when it renders, the data already exists.- To show that something is happening,
useNavigation()tells you the router’s state:"loading"while a loader is running after a click, and"idle"otherwise. - A loader can throw to signal a problem. Here we throw a
Responsewith status404. The router shows the route’serrorElementinstead of the page.useRouteError()reads the error, andisRouteErrorResponsetells a “Response” error from a code bug. RouterProvidercomes fromreact-router/domand takes the router.
We tested this example. Clicking Mouse first showed Loading... (the loader was running), then the page with Wireless Mouse. The page component never needed a loading state. Clicking Missing (/products/99) showed 404: Not found from the error element instead of crashing.
When should you use loaders? They shine in apps where many pages load data and you want faster, simpler pages (no waterfalls, central error handling). Data mode can also redirect from a loader (return redirect("/login")) to protect pages before they render. If your app only has a few pages with simple data, the declarative approach with Hooks is perfectly fine, and the data library from the data lessons (TanStack Query) combines well with either style. You can switch modes later, because the concepts are the same.
Common mistakes
1. Thinking a guard keeps data secret. It does not. The server must enforce access.
2. Redirecting without replace. The Back button returns to the guarded page, which redirects again, and the user gets stuck.
3. Forgetting to save the original location. Without state={{ from: location }}, users always land on the default page after logging in.
4. Crashing when location.state is empty. A user who opens /login directly has no state. Use ?. and a default.
5. Putting the AuthProvider outside the BrowserRouter but using routing hooks inside it. If the provider needs useNavigate, it must be inside the router.
6. Reading user.name on a page that is not guarded. It crashes for logged-out visitors. Put the page inside the guard group.
7. Protecting only the link. Hiding the menu item is not protection. The route must be guarded too.
8. Flashing the login page while the session is still loading. If login state loads asynchronously, the guard must wait. The next lesson shows how.
9. Forgetting that state resets on refresh. In-memory login state disappears on reload.
10. Mixing the two modes by accident. BrowserRouter with Routes is declarative mode. createBrowserRouter with RouterProvider is data mode. Use one of them for the whole app.
Practice
- Build the guard, the login page and the two private pages. Open
/accountwhile logged out and watch the URL. After logging in, where do you land? Open/logindirectly and log in. Where do you land now, and why? - Predict, then check: After logging in, press the browser’s Back button. Where do you go? Remove
replacefrom thenavigatecall inLoginand test again. - Log in, then press Refresh. What happens? Why?
- Add a third private page,
/settings. How many files must you change to protect it? - Debug: The Back button gets stuck in a loop between
/loginand a private page. Which prop is missing from<Navigate>? - Debug: Visiting
/logindirectly crashes withCannot read properties of undefined (reading 'from'). Which operator in the lesson code prevents this? - Make the login page redirect already logged-in users to
/dashboard(useNavigate). Where in the component do you put the check, and why must the Hooks come before it? - Think: A friend says “my
/adminpage is secure, because I hide it behindRequireAuth”. Explain in your own words why this is not enough, and what else is required.
Recap
- A protected route is a pathless layout route (
<Route element={<RequireAuth />}>) that renders<Outlet />for logged-in users and<Navigate to="/login" replace state={{ from: location }} />for everyone else. - The login page reads
location.state?.fromand callsnavigate(from, { replace: true }), so users return to the page they wanted. Provide a default for direct visits. - Use
replaceon redirects, so Back does not trap the user. - Route guards are UX, not security. The code of every page is public. Real protection happens on the server.
- Login state kept only in memory is lost on refresh (the next lesson fixes this).
- Loaders (data mode) load a page’s data before it renders, avoid waterfalls, and give each route a
loader,useLoaderData,useNavigationfor pending state and anerrorElementfor errors. - Declarative mode (
BrowserRouterandRoutes) and data mode (createBrowserRouterandRouterProvider) are alternatives. Pick one per app. - Next you will learn the security basics every React developer needs, and then how real authentication works.
Frequently asked questions
Is a protected route in React secure?
No. It only controls what your app renders. The JavaScript for every page is sent to every visitor, so a determined person can read it or change the logic in their browser. Anything private must be protected on the server, which should refuse to send data to users who are not allowed.
Why do I need state={{ from: location }}?
It remembers the page the user tried to visit, so that after logging in you can send them there. Without it, the login page does not know where they came from and can only use a default page.
What does a pathless route do?
A route with an element but no path is a layout route. It does not change the URL, and it wraps its child routes with its element. A guard like RequireAuth uses it to protect many pages at once.
What is the difference between declarative mode and data mode?
In declarative mode you describe routes with <Routes> and <Route> components and load data with your own Hooks. In data mode you give the router an array of route objects, and routes can have loader functions that load data before rendering. Both are valid. Data mode adds more features, and declarative mode is simpler.
Should I use loaders for everything?
No. They are useful when many pages load data and you want to avoid waterfalls and handle errors centrally. For small apps, or when you use a data library like TanStack Query, loading data in components works well. Start simple, and add loaders when you need them.
Why does login state disappear when I refresh?
State in React lives in the page’s memory. A refresh starts the app from zero. To keep a user logged in, the app must ask the server who the user is when it starts (usually with a cookie-based session), or read a saved value. The authentication lesson shows the usual approach.
See also: React Router Basics, Nested Layouts and Params, React Context, Fetch Data in React