React Forms: Controlled Inputs, Checkboxes and Selects
Build React forms with controlled inputs: connect text fields, checkboxes, radios, selects and textareas to state, handle submit, and reset the form.
What you will learn
Forms are how users give your app information: sign-up pages, search boxes, comments, checkout. In plain HTML the browser keeps the typed text inside the input, and you read it later. In React, the usual approach is different: your state holds the value, and the input just displays it.
In this lesson you will learn what a controlled input is, how to connect text inputs, checkboxes, radio buttons, selects and textareas to state, how to manage a whole form with one state object and one handler, and how to submit and reset it. You should know events, state and updating objects in state. If you need a refresher on form elements, see HTML forms basics and input types.
What is a controlled input?
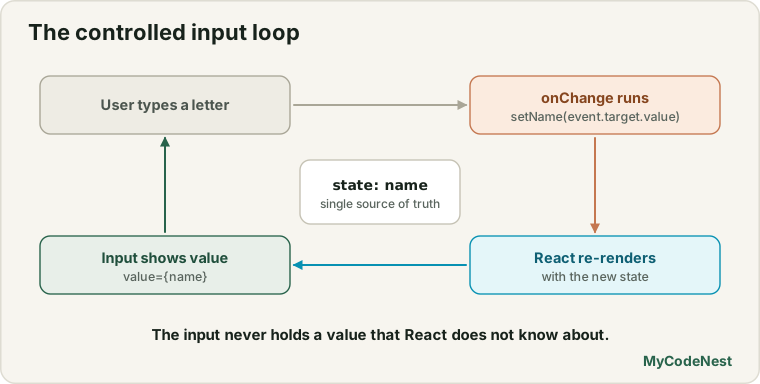
A controlled input is a form field whose value is controlled by React state. Two props make it work:
value={...}tells the input what to show. It always comes from state.onChange={...}runs whenever the user types. It updates the state.
The cycle looks like this:
User types a letter
      ↓
onChange runs  →  setName(new text)
      ↓
React re-renders with the new state
      ↓
The input shows value={name}
The state is the single source of truth. The input never has a value that React does not know about.
Your first controlled input
import { useState } from 'react';

function NameInput() {
  const [name, setName] = useState("");

  return (
    <div>
      <label htmlFor="name">Your name</label>
      <input
        id="name"
        type="text"
        value={name}
        onChange={(event) => setName(event.target.value)}
      />
      <p>Hello, {name || "stranger"}!</p>
    </div>
  );
}

export default NameInput;
At first the page shows an empty box and Hello, stranger!. Type Aisha, and the text below updates with every letter: Hello, Aisha!.
Step by step:
useState("")starts with an empty string. Use"", notnullorundefined, as the starting value for text fields.value={name}makes the input display the state.onChangereceives the event.event.target.valueis the text currently in the field, andsetNamestores it.name || "stranger"shows a fallback while the field is empty. (||returns the right side when the left side is empty.)htmlFor="name"connects the<label>to the input withid="name". Clicking the label focuses the input, and screen readers announce it. Always label your inputs.
Because the value lives in state, you can use it anywhere: show it live, validate it, or send it to a server.
A form with several fields
Writing one useState and one handler per field gets repetitive. A common pattern is one state object and one handler for the whole form. The trick is to give each input a name attribute that matches its key in the state:
import { useState } from 'react';

function SignupForm() {
  const [form, setForm] = useState({
    name: "",
    email: "",
    plan: "free",
    newsletter: false,
  });
  const [submitted, setSubmitted] = useState(null);

  function handleChange(event) {
    const { name, value, type, checked } = event.target;
    setForm({ ...form, [name]: type === "checkbox" ? checked : value });
  }

  function handleSubmit(event) {
    event.preventDefault();
    setSubmitted(form);
  }

  function handleReset() {
    setForm({ name: "", email: "", plan: "free", newsletter: false });
    setSubmitted(null);
  }

  return (
    <form onSubmit={handleSubmit}>
      <label htmlFor="name">Name</label>
      <input id="name" name="name" value={form.name} onChange={handleChange} />

      <label htmlFor="email">Email</label>
      <input id="email" name="email" type="email" value={form.email} onChange={handleChange} />

      <label htmlFor="plan">Plan</label>
      <select id="plan" name="plan" value={form.plan} onChange={handleChange}>
        <option value="free">Free</option>
        <option value="pro">Pro</option>
      </select>

      <label>
        <input
          type="checkbox"
          name="newsletter"
          checked={form.newsletter}
          onChange={handleChange}
        />
        Send me the newsletter
      </label>

      <button type="submit">Sign up</button>
      <button type="button" onClick={handleReset}>Reset</button>

      {submitted && (
        <p>
          Welcome, {submitted.name} ({submitted.email}) - {submitted.plan}
          {submitted.newsletter ? ", newsletter on" : ""}
        </p>
      )}
    </form>
  );
}

export default SignupForm;
Test it in your project: type Ravi as the name, [email protected] as the email, choose Pro, tick the newsletter box and press Sign up. The page shows:
Welcome, Ravi ([email protected]) - pro, newsletter onPress Reset and every field returns to its starting value, and the message disappears.
Let us understand the important lines.
One handler for every field
function handleChange(event) {
  const { name, value, type, checked } = event.target;
  setForm({ ...form, [name]: type === "checkbox" ? checked : value });
}- Destructuring pulls
name,value,typeandcheckedfromevent.target. Thenameis the input’snameattribute, for example"email". [name]: ...is a computed property name. The square brackets mean “use the value ofnameas the key”. Ifnameis"email", this updates theemailkey.{ ...form, ... }copies the old form, then overrides that one key. This is the object update pattern from the previous lesson.- Checkboxes use
checked(true or false) instead ofvalue, so the ternary picks the right one.
This means you can add more fields later without writing another handler. Just add the field to the state and give the input a matching name.
Each input type
Here is how each field type connects to state:
| Element | Control it with | The value you read |
|---|---|---|
<input type="text">, email, password, number |
value and onChange |
event.target.value (always a string) |
<textarea> |
value and onChange |
event.target.value |
<select> |
value on the <select> |
event.target.value |
<input type="checkbox"> |
checked and onChange |
event.target.checked |
<input type="radio"> |
checked on each radio |
event.target.value of the chosen one |
Textarea. In HTML, a textarea’s content goes between its tags. In React, it works like an input and takes a value prop:
<textarea name="message" value={form.message} onChange={handleChange} />Select. Put value on the <select> itself, not selected on an option. React then marks the right option for you.
Radio buttons. A group of radios shares one name. Each radio is checked when the state matches its own value:
<label>
  <input
    type="radio"
    name="plan"
    value="free"
    checked={form.plan === "free"}
    onChange={handleChange}
  />
  Free
</label>
<label>
  <input
    type="radio"
    name="plan"
    value="pro"
    checked={form.plan === "pro"}
    onChange={handleChange}
  />
  Pro
</label>
Number inputs. event.target.value is always a string, even for type="number". Convert it with Number(event.target.value) if you need to calculate with it.
Submitting the form
A form submits when the user clicks a submit button or presses Enter inside a field. Handle it with onSubmit on the <form>:
function handleSubmit(event) {
  event.preventDefault();   // stop the page from reloading
  setSubmitted(form);       // use the data
}event.preventDefault()is essential. Without it, the browser reloads the page, as you saw in the events lesson.- In a real app you would send
formto a server here. That is covered in the CRUD with APIs lesson. In this lesson we just show it on the page. - Any
<button>inside a form is a submit button by default. That is why the Reset button hastype="button": it should not submit the form.
Uncontrolled inputs (a quick note)
You do not have to control every input. An uncontrolled input keeps its own value in the browser, and you read it when needed, for example with FormData (see the FormData lesson). You give it a starting value with defaultValue instead of value.
Controlled inputs are the standard choice for beginners and for most forms, because you can react to every change: live validation, live search, and formatting. Newer React versions also offer form Actions, which make simple forms even shorter. They are covered in a later lesson, after you know the fundamentals.
Common mistakes
1. value without onChange. The input becomes read-only and React warns:
You provided a `value` prop to a form field without an `onChange` handler. This will render a read-only field.Add onChange, or use defaultValue for an uncontrolled field.
2. Starting with null or undefined. For a text input this gives the warning value prop on input should not be null. Use an empty string "" as the initial state.
3. Forgetting the name attribute. With the single-handler pattern, event.target.name is empty, so the wrong key is updated. Make each name match a key in your state.
4. Using value instead of checked for checkboxes. A checkbox is controlled by checked. Read event.target.checked, not value.
5. Forgetting preventDefault() in onSubmit. The page reloads and state is lost.
6. Forgetting type="button" on non-submit buttons. A button inside a form submits it by default. Mark Reset, Cancel and similar buttons with type="button".
7. Treating numbers as numbers. "5" + 1 gives "51". Convert with Number().
8. Skipping labels. Placeholder text is not a label. Use <label htmlFor> with a matching id.
Practice
-
Build a controlled
NameInputthat showsHello, <name>!as you type. ShowHello, stranger!when it is empty. -
Build a
CommentBoxwith atextareaand a live character counter (name.length). Show the number below the box. -
Predict, then check: What happens if you write
<input value={name} />without anonChange? Test it and read the warning in the console. -
Build a
SignupFormwith name, email and a planselect. Use one state object and onehandleChange. On submit, show a summary. -
Add a newsletter checkbox and two radio buttons (
MonthlyandYearly) to your form. Show their values in the summary. -
Debug: The user can type, but the email field changes the name field instead. What is likely wrong?
<input name="name" value={form.name} onChange={handleChange} /> <input name="name" value={form.email} onChange={handleChange} /> -
Debug: This checkbox never becomes ticked. Fix it.
<input type="checkbox" name="newsletter" value={form.newsletter} onChange={handleChange} /> -
Add a Reset button that clears every field and the summary message. Why does it need
type="button"?
Recap
- A controlled input takes its
valuefrom state and updates state inonChange. The state is the single source of truth. - Start text fields with
"". Always connect each field to a<label htmlFor>. - For many fields, use one state object, give each input a
name, and write one handler with[event.target.name]: value. - Checkboxes use
checkedandevent.target.checked. Selects and textareas usevalue. Radios usecheckedon each option. event.target.valueis always a string. Convert numbers yourself.- Handle
onSubmiton the<form>and callevent.preventDefault(). - Buttons that should not submit need
type="button". - Next you will validate form data and show helpful error messages.
Frequently asked questions
What is the difference between controlled and uncontrolled inputs?
A controlled input gets its value from React state and updates state on every change. An uncontrolled input keeps its value inside the browser, and you read it only when you need it. Controlled inputs give you more power for validation and live feedback.
Why does my input not let me type?
You probably set value={something} without an onChange that updates that state. React then keeps the field read-only. Add an onChange handler that calls the setter, or use defaultValue for an uncontrolled field.
Do I need a separate useState for every field?
No. You can, and it is fine for small forms, but one state object with a single handler is shorter for bigger forms. Use the name attribute and a computed key [name] to update the right field.
Why is the number from my number input a string?
Every event.target.value is a string, even for type="number". Use Number(event.target.value) or parseInt before you do any calculation.
Does onChange work like in HTML?
Not exactly. React’s onChange runs on every keystroke, like the browser’s input event, not when the field loses focus. This is what you need to keep state in sync while the user types.
Should I send the form data inside handleSubmit?
Yes, that is the right place. After preventDefault(), you can send the form state to a server with fetch. You will build that in the CRUD with APIs lesson. Validate the data first, which is the next lesson.
See also: HTML Forms Basics, HTML Input Types, JavaScript FormData, Updating Objects and Arrays in State