React Router Basics: Build Multi-Page Apps
Learn React Router v8 step by step: install it, set up BrowserRouter, define Routes, use Link and NavLink, redirect with Navigate, navigate with useNavigate.
What you will learn
In the last lesson you built a tiny router to learn how routing works. Now you will use the real thing: React Router, the most popular routing library for React. You will learn how to install it, define pages, link between them, highlight the current page, show a “not found” page, redirect, and move to another page from code (for example after a form is submitted).
This lesson uses a third-party package. React Router is not part of React. We tested React Router 8.5 (version 8 came out in June 2026). Always check the official documentation for the latest details, because routers change more often than React itself.
Before you install: three important facts
- The package name is
react-router. In older tutorials you will seereact-router-dom. Version 8 removed that package. If a tutorial tells you to installreact-router-dom, it is outdated. Import everything from"react-router". - It needs a recent setup. React Router 8 needs React 19.2.7 or newer (this course uses React 19.3) and Node.js 22.22 or newer. Check with
node -v. If your Node.js is older, install the current LTS version from nodejs.org, as in the setup lesson. - It has three “modes”. React Router can be used in different ways:
| Mode | What it is | Used in this course |
|---|---|---|
| Declarative | You describe routes with components (<Routes>, <Route>). Simple. |
Yes, for all the basics |
| Data | Routes are an object, and routes can have loader functions that load data |
A short preview in the next lesson |
| Framework | A full framework (server rendering and more) built on React Router | No (it is a different way to build apps) |
We start with declarative mode, the simplest one, and it already covers most apps.
Install and set up
In your project’s terminal:
npm install react-routerThen wrap your app in BrowserRouter. It is the component that connects React Router to the browser’s address bar, using the History API from the last lesson. Replace src/main.jsx:
import { StrictMode } from 'react'
import { createRoot } from 'react-dom/client'
import { BrowserRouter } from 'react-router'
import './index.css'
import App from './App.jsx'

createRoot(document.getElementById('root')).render(
  <StrictMode>
    <BrowserRouter>
      <App />
    </BrowserRouter>
  </StrictMode>,
)
Everything inside <BrowserRouter> can now use routing. It works like a context provider: components below it can read the current URL.
Your first pages
Each page is a normal component. Create a folder src/pages with these small files.
src/pages/Home.jsx:
function Home() {
  return (
    <>
      <title>Home | My Site</title>
      <h1>Welcome</h1>
      <p>This is the home page.</p>
    </>
  );
}

export default Home;src/pages/About.jsx:
function About() {
  return (
    <>
      <title>About | My Site</title>
      <h1>About us</h1>
      <p>We build small React apps.</p>
    </>
  );
}

export default About;src/pages/Thanks.jsx:
import { Link } from 'react-router';

function Thanks() {
  return (
    <>
      <title>Thank you | My Site</title>
      <h1>Thank you!</h1>
      <p>We received your message.</p>
      <Link to="/">Back to the home page</Link>
    </>
  );
}

export default Thanks;src/pages/NotFound.jsx:
import { Link } from 'react-router';

function NotFound() {
  return (
    <>
      <title>Page not found | My Site</title>
      <h1>Page not found</h1>
      <p>The page you are looking for does not exist.</p>
      <Link to="/">Go to the home page</Link>
    </>
  );
}

export default NotFound;
The <title> element at the top of each page is a React 19 feature: you can render a <title> in any component, and React puts it into the page’s <head>, so the browser tab shows the right title for each page. We tested it: the tab title changed to Home page and to About page as we moved between routes. (This is called document metadata. It makes pages easier to tell apart in tabs, history and bookmarks, and it helps screen reader users know where they are.)
The Contact page and useNavigate
Sometimes you want to go to another page from code, for example after a form is submitted. For that, React Router gives you the useNavigate Hook. src/pages/Contact.jsx:
import { useNavigate } from 'react-router';

function Contact() {
  const navigate = useNavigate();

  function handleSubmit(event) {
    event.preventDefault();
    // In a real app, send the message to a server here.
    navigate("/thanks", { replace: true });
  }

  return (
    <form onSubmit={handleSubmit}>
      <title>Contact | My Site</title>
      <h1>Contact</h1>
      <label htmlFor="message">Message</label>
      <textarea id="message" required />
      <button type="submit">Send</button>
    </form>
  );
}

export default Contact;
useNavigate() returns a function. Calling navigate("/thanks") changes the URL and shows that page, exactly like clicking a link.
The option { replace: true } replaces the current history entry instead of adding a new one (the replaceState idea from the last lesson). After sending the form, the user lands on /thanks, and pressing Back does not return to the (already submitted) contact form. We tested it: after submitting, the path was /thanks, and Back went to the page the user visited before the contact page, not to /contact.
You can also go back or forward by number: navigate(-1) goes one step back, like the Back button.
Defining the routes
Now the heart of routing. Replace src/App.jsx:
import { useState } from 'react';
import { Routes, Route, NavLink, Navigate } from 'react-router';
import Home from './pages/Home.jsx';
import About from './pages/About.jsx';
import Contact from './pages/Contact.jsx';
import Thanks from './pages/Thanks.jsx';
import NotFound from './pages/NotFound.jsx';

function App() {
  const [clicks, setClicks] = useState(0);

  return (
    <>
      <header>
        <nav aria-label="Main">
          <NavLink to="/">Home</NavLink>{" "}
          <NavLink to="/about">About</NavLink>{" "}
          <NavLink to="/contact">Contact</NavLink>
        </nav>
        <button onClick={() => setClicks(clicks + 1)}>Clicks: {clicks}</button>
      </header>

      <main>
        <Routes>
          <Route path="/" element={<Home />} />
          <Route path="/about" element={<About />} />
          <Route path="/contact" element={<Contact />} />
          <Route path="/thanks" element={<Thanks />} />
          <Route path="/team" element={<Navigate to="/about" replace />} />
          <Route path="*" element={<NotFound />} />
        </Routes>
      </main>
    </>
  );
}

export default App;
Let us go through the new pieces.
<Routes> and <Route>
<Routes>looks at the current URL and shows the one route that matches best.- Each
<Route>connects apathto anelement, which is the JSX to show.path="/about"withelement={<About />}means: “when the URL is/about, show<About />”. - The routes are components, so they are easy to read, and they nest (next lesson).
The “not found” route
path="*" matches any URL that no other route matched. Put it last (the order does not matter for matching, because Routes picks the best match, but it reads better). Always add one, so a wrong address shows a helpful page and not a blank screen. We tested a URL that does not exist (/nothing-here): the NotFound page appeared, with the right tab title.
Link and NavLink
To move between pages without reloading, use <Link> instead of <a>:
<Link to="/about">About</Link>It renders a real <a href="/about">, so right-click, Ctrl+click and screen readers work, just like the Link you built last time. The to prop is the destination.
NavLink is a Link for navigation menus. It knows when it points to the current page, and then it:
- adds the CSS class
active, and - adds the attribute
aria-current="page", which tells screen readers “this is the current page”.
We tested it. On /about, the About link had the class active and aria-current="page", and the other two links had neither. You can style it in CSS:
nav a.active {
  font-weight: 700;
  text-decoration: underline;
}
(The link to / is a special case: it is not marked active on other pages, which is what you want.)
Navigate: redirecting
The /team route has no page of its own. <Navigate to="/about" replace /> is a component that redirects: as soon as it renders, it sends the user to /about. With replace, the old URL is replaced, so Back does not bounce the user back to /team (which would redirect again, and trap them). We tested it: visiting /team ended on /about, showing About us.
Use a redirect for old URLs that moved, and later for protected pages.
What happens in the browser
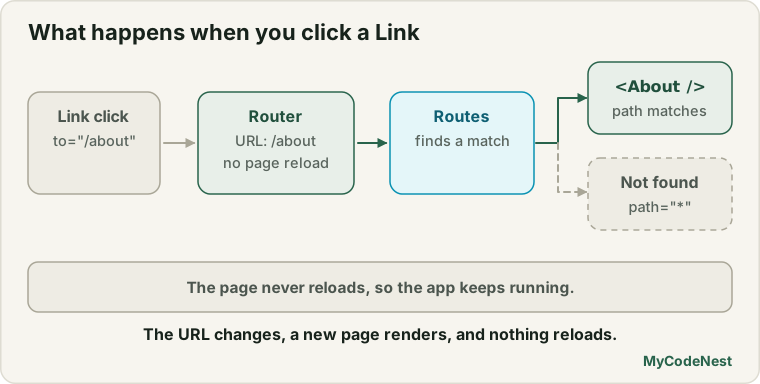
Run the app and try this:
- You see Welcome, the tab title is
Home | My Site, and the Home link is highlighted. - Click the Clicks button three times.
- Click About. The address bar shows
/about, the page shows About us, the tab title changes, and the About link becomes active. The counter still says Clicks: 3: the page did not reload. - Click Contact, type a message and press Send. You land on Thank you! at
/thanks. - Press the browser’s Back button. You do not return to the contact form.
- Type
/helloin the address bar. You see Page not found. (This reload works in development because the dev server has the SPA fallback from the last lesson.) - Visit
/team. You are sent to/about.
Common mistakes
1. Installing react-router-dom. Version 8 removed it. Install react-router and import from "react-router".
2. Forgetting BrowserRouter. Using Link or Routes outside a router gives an error saying that these components may be used only inside a router. Wrap your app in BrowserRouter in main.jsx.
3. Using <a href> for in-app links. It reloads the page and loses state. Use Link or NavLink.
4. Forgetting the * route. Unknown URLs show an empty page.
5. A redirect without replace. The Back button traps the user in a redirect loop.
6. Calling navigate() while rendering. Calling it directly in the component body is a side effect. Call it in an event handler (like handleSubmit), or use the <Navigate> component for redirects.
7. Missing the leading slash. to="about" is relative to the current route and may not do what you expect. Use to="/about" for absolute paths.
8. Not setting a title per page. Every tab says the same thing. Render a <title> in each page.
9. Putting routing hooks in a component outside the router. Hooks like useNavigate need to run inside BrowserRouter.
10. Old Node.js. React Router 8 needs Node.js 22.22 or newer. If installing shows an engine warning, update Node.js.
Practice
- Install
react-router, wrap your app inBrowserRouter, and build the five pages and the routes from this lesson. Check the browser tab title as you move between pages. - Predict, then check: Click the counter button to 3, click About, and then click Home. What does the counter show, and why?
- Add a Services page at
/serviceswith aNavLinkin the menu. Make sure it gets highlighted when active. - Predict, then check: Visit
/contact, submit the form, and press Back. Where do you land? Removereplace: trueand test again. What changed? - Add a redirect so that
/homegoes to/. UseNavigate. - Debug: The app crashes with an error saying a
Linkmay be used only inside aRouter. Where do you look first? - Debug: A learner wrote
onClick={navigate("/thanks")}in a button. What goes wrong, and what is the right way? - Add a Back button on the
Aboutpage that callsnavigate(-1). Test it after visiting the page through the menu and after opening it directly in a new tab. What difference do you notice, and why?
Recap
- Install
react-router(notreact-router-dom). Version 8 needs React 19.2.7+ and Node.js 22.22+. - Start with declarative mode: wrap the app in
BrowserRouter. <Routes>shows the best matching<Route path element>. Addpath="*"for a not-found page.LinkandNavLinknavigate without reloading.NavLinkaddsclass="active"andaria-current="page"for the current page.useNavigate()moves to another page from code (event handlers).{ replace: true }replaces the history entry.<Navigate to replace />redirects while rendering.- A
<title>in each page component sets the tab title (React 19). - State in components outside the routes (like the counter) survives page changes.
- Next you will learn nested routes, URL parameters and search parameters.
Frequently asked questions
Should I install react-router or react-router-dom?
Install react-router. In version 7, react-router-dom became a thin compatibility package, and version 8 removed it completely. Import everything, such as BrowserRouter, Routes, Link and useNavigate, from "react-router".
What is the difference between Link and NavLink?
Link is a navigation link. NavLink does the same, and also knows whether it points to the current page, adding the class active and aria-current="page" so you can style it and screen readers can announce it. Use NavLink in menus.
When should I use useNavigate and when Navigate?
Use useNavigate() when navigation is the result of an action, such as submitting a form or clicking a button (inside an event handler). Use the <Navigate> component when the redirect should happen simply because a route is rendered, for example for an old URL or a protected page.
What does replace do?
It replaces the current entry in the browser history instead of adding a new one. After a redirect or a form submit, it stops the Back button from returning to the page the user should not see again.
Do I need BrowserRouter in every file?
No. You add it once, in main.jsx, around your whole app. Every component inside it can then use Link, Routes, useNavigate and the other routing features.
What are data mode and framework mode?
They are other ways to use React Router. Data mode defines routes as an object and lets each route load its own data with a loader. Framework mode turns React Router into a full framework with server rendering. Declarative mode, which this lesson uses, is the simplest, and is enough for many apps.
See also: Single-Page Apps and Client-Side Routing, React Context, HTML Links, Set Up React with Vite