Project 1: Build a To-Do List App in React
Build a complete React to-do app step by step: components, props, state, forms, lists, filters and events, with every file explained.
What you will build
You have learned components, props, lists, conditional rendering, events, state, and forms. Now you will put them all together in one real application: a to-do list. It is a classic first project because it uses almost every beginner skill, and you will actually use the result.
Your finished app will let you:
- Add a task with a form (empty tasks are ignored).
- Tick a task as done, or untick it.
- Delete a task.
- See how many tasks are left.
- Filter the list: all, active or done.
- Clear all completed tasks with one button.
Here is what the finished page looks like in text form:
My Tasks

New task  [ What needs to be done?        ] [Add]

[x] Learn JSX                    [Delete]
[x] Learn props                  [Delete]
[ ] Build a to-do app            [Delete]

1 task left     [all] [active] [done]     [Clear completed]
You need a working Vite React project (see setting up React with Vite) with the clean App.jsx from the project structure lesson.
Which skills does this project use?
| Skill | Lesson |
|---|---|
| Function components and imports | First component |
| Passing data and functions down | Props |
| Lists and keys | Lists and keys |
| Showing an empty message | Conditional rendering |
| Click and submit handlers | Events |
useState |
useState |
| Add, edit, delete items immutably | Updating state |
| Controlled input and submit | Forms |
Step 1: plan before you code
Good developers plan the component tree and decide where each piece of state lives before writing code. Our plan:
App                     owns the list of todos and the current filter
├── TodoForm            owns only the text being typed
├── TodoList            shows the visible todos
│   └── TodoItem        shows one todo (checkbox, title, delete button)
└── TodoFooter          shows the count, the filter buttons and "Clear completed"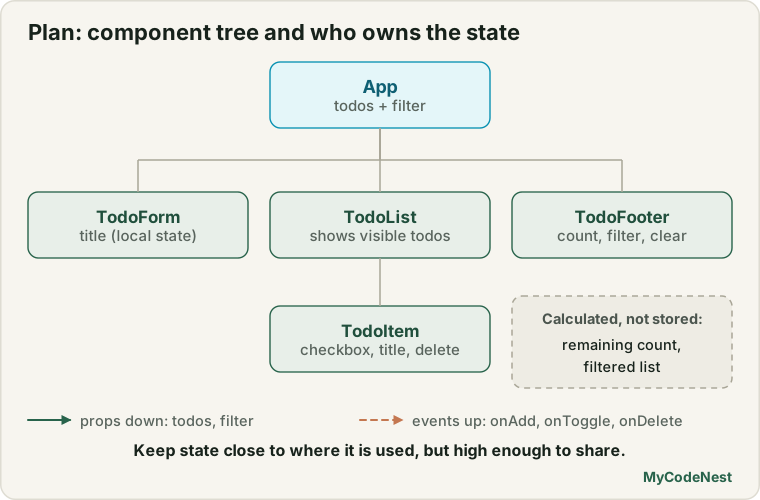
Now think about the data. A single todo is an object:
{ id: 1, title: "Learn JSX", done: true }Why an id? Each todo needs a stable, unique key for the list, and a way to say which todo to toggle or delete. We will not use the array index for that, because the list changes.
Who owns which state?
| State | Owner | Why |
|---|---|---|
todos (the array) |
App |
TodoList, TodoFooter and the handlers all need it |
filter ("all", "active", "done") |
App |
The footer changes it, and the list depends on it |
title (text in the input) |
TodoForm |
Nobody else needs it, so it stays local |
Notice the rule we are following: keep state as close as possible to where it is used, but high enough that every component that needs it can reach it. The next lessons will explain this idea in depth.
We do not store the number of remaining tasks or the filtered list in state. We calculate them from todos and filter on every render. That avoids bugs where two values get out of sync.
Step 2: create the files
Inside src, create a folder components. Your project will have these files:
src/
├── components/
│   ├── TodoForm.jsx
│   ├── TodoFooter.jsx
│   ├── TodoItem.jsx
│   └── TodoList.jsx
├── App.css        (replace the starter content)
├── App.jsx        (replace)
├── index.css
└── main.jsx
We build from the smallest piece upward.
Step 3: TodoItem, one task
src/components/TodoItem.jsx:
function TodoItem({ todo, onToggle, onDelete }) {
  return (
    <li className={todo.done ? "todo-item todo-item--done" : "todo-item"}>
      <label>
        <input type="checkbox" checked={todo.done} onChange={() => onToggle(todo.id)} />
        <span>{todo.title}</span>
      </label>
      <button type="button" onClick={() => onDelete(todo.id)} aria-label={`Delete ${todo.title}`}>
        Delete
      </button>
    </li>
  );
}

export default TodoItem;
What happens here:
- The component receives one todo and two function props:
onToggleandonDelete. It does not change any data itself. It only reports what the user did. (This is the “events as props” pattern from the events lesson.) - The
classNameuses a ternary, so finished tasks get an extra classtodo-item--donefor styling. - The checkbox is controlled:
checked={todo.done}. When it changes, we callonToggle(todo.id)so the parent can update the data. - Wrapping the checkbox and text in a
<label>means clicking the text also toggles the box. aria-labelgives screen readers a clear name for each Delete button, such asDelete Learn JSX. Without it, every button would just say “Delete”.
Step 4: TodoList, the list
src/components/TodoList.jsx:
import TodoItem from './TodoItem.jsx';

function TodoList({ todos, onToggle, onDelete }) {
  if (todos.length === 0) {
    return <p className="empty">Nothing to show here.</p>;
  }

  return (
    <ul className="todo-list">
      {todos.map((todo) => (
        <TodoItem key={todo.id} todo={todo} onToggle={onToggle} onDelete={onDelete} />
      ))}
    </ul>
  );
}

export default TodoList;- If there are no todos to show, it returns a friendly message (an early return, from the conditional rendering lesson).
- Otherwise it maps each todo to a
TodoItem, withkey={todo.id}. - It simply passes the two handlers down to each item.
Step 5: TodoForm, adding a task
src/components/TodoForm.jsx:
import { useState } from 'react';

function TodoForm({ onAdd }) {
  const [title, setTitle] = useState("");

  function handleSubmit(event) {
    event.preventDefault();
    const trimmed = title.trim();
    if (trimmed === "") {
      return;
    }
    onAdd(trimmed);
    setTitle("");
  }

  return (
    <form onSubmit={handleSubmit} className="todo-form">
      <label htmlFor="new-task">New task</label>
      <input
        id="new-task"
        type="text"
        value={title}
        onChange={(event) => setTitle(event.target.value)}
        placeholder="What needs to be done?"
      />
      <button type="submit">Add</button>
    </form>
  );
}

export default TodoForm;
This is a controlled input (see the forms lesson):
- The text being typed lives in this component’s own state,
title. - On submit,
event.preventDefault()stops the page reload. title.trim()removes spaces from both ends. If nothing is left, the function returns early, so empty and blank tasks are ignored.onAdd(trimmed)hands the new title to the parent. The form does not know where todos are stored.setTitle("")clears the input for the next task.
Step 6: TodoFooter, count, filters and clear
src/components/TodoFooter.jsx:
const filters = ["all", "active", "done"];

function TodoFooter({ remaining, hasCompleted, filter, onFilterChange, onClearCompleted }) {
  return (
    <footer className="todo-footer">
      <p>{remaining} {remaining === 1 ? "task" : "tasks"} left</p>
      <div>
        {filters.map((name) => (
          <button
            key={name}
            type="button"
            onClick={() => onFilterChange(name)}
            aria-pressed={filter === name}
          >
            {name}
          </button>
        ))}
      </div>
      {hasCompleted && (
        <button type="button" onClick={onClearCompleted}>Clear completed</button>
      )}
    </footer>
  );
}

export default TodoFooter;- The
filtersarray lives outside the component, because it never changes. Each filter button is created withmap(), with the filter name as the key. aria-pressed={filter === name}tells assistive technology which filter is active, and you can also use it in CSS.- The ternary
remaining === 1 ? "task" : "tasks"gets the grammar right (1 task left,2 tasks left). - The Clear completed button uses
&&, so it only appears when at least one task is done. - This component is purely presentational: it gets everything through props and owns no state.
Step 7: App, where it all connects
Replace src/App.jsx with:
import { useState } from 'react';
import './App.css';
import TodoForm from './components/TodoForm.jsx';
import TodoList from './components/TodoList.jsx';
import TodoFooter from './components/TodoFooter.jsx';

let nextId = 4;

const initialTodos = [
  { id: 1, title: "Learn JSX", done: true },
  { id: 2, title: "Learn props", done: true },
  { id: 3, title: "Build a to-do app", done: false },
];

function App() {
  const [todos, setTodos] = useState(initialTodos);
  const [filter, setFilter] = useState("all");

  function addTodo(title) {
    setTodos([...todos, { id: nextId++, title, done: false }]);
  }

  function toggleTodo(id) {
    setTodos(todos.map((todo) => todo.id === id ? { ...todo, done: !todo.done } : todo));
  }

  function deleteTodo(id) {
    setTodos(todos.filter((todo) => todo.id !== id));
  }

  function clearCompleted() {
    setTodos(todos.filter((todo) => !todo.done));
  }

  const visibleTodos = todos.filter((todo) => {
    if (filter === "active") return !todo.done;
    if (filter === "done") return todo.done;
    return true;
  });
  const remaining = todos.filter((todo) => !todo.done).length;

  return (
    <main className="todo-app">
      <h1>My Tasks</h1>
      <TodoForm onAdd={addTodo} />
      <TodoList todos={visibleTodos} onToggle={toggleTodo} onDelete={deleteTodo} />
      <TodoFooter
        remaining={remaining}
        hasCompleted={todos.length > remaining}
        filter={filter}
        onFilterChange={setFilter}
        onClearCompleted={clearCompleted}
      />
    </main>
  );
}

export default App;
This is the brain of the app. Let us go through it:
- Two pieces of state:
todosandfilter. nextIdis a plain variable outside the component. It gives each new task a unique id (4,5,6…). It is only changed inside theaddTodoevent handler, never during rendering.- Four handlers, each using an update pattern from the state updating lesson:
addTodo: a new array with the old todos plus one new one ([...todos, newTodo]).toggleTodo:map()returns a new object only for the matching todo and leaves the others unchanged.deleteTodoandclearCompleted:filter()keeps only the todos we want.
- Calculated values:
visibleTodos(depends onfilter) andremainingare computed on every render. They are not state. hasCompleted={todos.length > remaining}is a quick way to ask “is there any done task?”: if the total is bigger than the number left, some tasks are done.- The JSX passes data and handlers down as props. Notice
onFilterChange={setFilter}: a state setter is just a function, so you can pass it directly.
Step 8: styling
Replace the content of src/App.css with:
.todo-app {
  max-width: 480px;
  margin: 0 auto;
  padding: 24px 16px;
  text-align: left;
}

.todo-form {
  display: grid;
  gap: 8px;
  margin-bottom: 16px;
}

.todo-form input {
  padding: 8px 12px;
  font-size: 1rem;
}

.todo-list {
  list-style: none;
  margin: 0;
  padding: 0;
}

.todo-item {
  display: flex;
  align-items: center;
  justify-content: space-between;
  gap: 12px;
  padding: 8px 0;
  border-bottom: 1px solid #ccc;
}

.todo-item--done span {
  text-decoration: line-through;
  opacity: 0.6;
}

.todo-footer {
  display: flex;
  flex-wrap: wrap;
  align-items: center;
  justify-content: space-between;
  gap: 8px;
  margin-top: 16px;
}

.todo-footer button[aria-pressed="true"] {
  font-weight: 700;
  text-decoration: underline;
}

.empty {
  padding: 16px 0;
  opacity: 0.7;
}
Because App.jsx imports ./App.css, Vite loads it. The selector button[aria-pressed="true"] styles the active filter, using the attribute we set in the footer. (This CSS uses ideas from the flexbox lessons and attribute selectors.)
Try your app
Run npm run dev and test each feature in order. This is what you should see:
- At the start: three tasks, two ticked, and
1 task left. - Add a task: type
Write testsand pressEnteror click Add. The task appears at the bottom, the input is cleared, and the footer says2 tasks left. Submitting an empty or blank field does nothing. - Toggle: tick
Build a to-do app. It gets a line through it, and the footer says1 task left. - Filter: click active. Only unfinished tasks remain. Click done to see only finished ones. Click all to see everything.
- Clear completed: click it (the button only exists while something is done). All ticked tasks disappear.
- Empty message: with the done filter active and nothing done, you see
Nothing to show here. - Delete: click Delete on any task. It disappears and the count updates.
How the data flows
Here is the whole app in one picture. This is the most important idea of the project:
              ┌───────────── App ─────────────┐
              │ state: todos, filter           │
              │ handlers: add, toggle, delete  │
              └──────┬─────────────┬───────────┘
        props down   │             │   props down
                     ▼             ▼
               TodoList        TodoFooter
                     │
                     ▼
                TodoItem
                     │
   user clicks ─────►│  onToggle(id)  ──► App.toggleTodo ──► setTodos ──► re-render
Data flows down as props. Events flow up as function calls. Every change goes through App, so there is only one place where the list can change. This makes the app easy to reason about and easy to debug.
Common mistakes
1. Mutating the todos array. Writing todos.push(newTodo) or todo.done = true and then calling setTodos(todos) will not update the screen. Create new arrays and objects.
2. Using the index as the key. With filtering and deleting, indexes change, so React can mix up rows. Use todo.id.
3. Storing derived data in state. Do not add useState for remaining or visibleTodos. Calculate them.
4. Forgetting event.preventDefault(). The page reloads when you add a task, and everything resets.
5. Calling the handler immediately. onClick={onDelete(todo.id)} runs during rendering. Use onClick={() => onDelete(todo.id)}.
6. Putting onSubmit on the button. Put it on the <form> so the Enter key works too.
7. Forgetting to clear the input. After adding, call setTitle("").
8. Giving two todos the same id. The next id must always be new. nextId++ takes care of this.
Practice (extend the project)
-
Show a task counter in the page title area:
3 tasks in total. Calculate it fromtodos. -
Add a Mark all as done button to the footer. It should set
done: trueon every todo usingmap(). -
Predict, then check: What happens if you change
key={todo.id}tokey={Math.random()}inTodoList? Test it with the keyboard: pressTabto focus a checkbox, pressSpaceto tick it, and watch whether the focus stays on that checkbox. Then change the key back. -
Prevent duplicate titles: in
addTodo, do nothing if a task with the same title (ignoring capital letters) already exists. -
Add a priority field to each todo (
"low","normal","high") and show it next to the title. Use aselectinTodoFormto choose it. -
Debug: A learner wrote this
toggleTodo. Ticking a task does nothing on screen. Why, and how do you fix it?function toggleTodo(id) { const todo = todos.find((todo) => todo.id === id); todo.done = !todo.done; setTodos(todos); } -
Add an Edit feature: clicking a task’s title turns it into an input. (Hint:
TodoItemcan keep its ownisEditingstate.) -
Style the high priority tasks with a red left border using a dynamic class name.
Recap
- You built a complete app with five components and two pieces of state.
- Plan first: draw the component tree and decide who owns each piece of state.
- Data flows down as props, events flow up as function props. All changes go through
App. - Update arrays by creating new ones:
[...todos, item],map()andfilter(). - Calculate the filtered list and the count instead of storing them.
- Keep small, local state (the text in the input) inside the component that needs it.
- Next you will study this “who owns the state” question properly, in the lesson on lifting state up.
Frequently asked questions
Why is the todos state in App and not in TodoList?
Because several components need it: TodoList shows it, TodoFooter counts it, and the handlers change it. State must live in the closest component that is a parent of everything that needs it. That is App.
Why is title state inside TodoForm?
Only the form cares about the text being typed. The rest of the app only needs the finished title, which the form sends up with onAdd. Keeping state local when possible makes components simpler and easier to reuse.
Will my tasks disappear when I refresh the page?
Yes. State lives in memory, so a refresh resets it to initialTodos. You can save tasks in localStorage (see the storage lesson). The custom Hooks lesson shows how to do this cleanly in React, and you will upgrade this very app.
Why is nextId outside the component?
A variable inside the component would be created again on every render and reset to 4. Outside, it keeps its value. It is only changed in an event handler, which is allowed. For a real app, ids usually come from a database or from crypto.randomUUID().
Is it fine that every component is in a separate file?
Yes, that is the common convention: one component per file, named after the component. It keeps files short and easy to find, and each file imports only what it needs.
How can I improve this app further?
Add editing, due dates, categories, drag-and-drop ordering, saving to localStorage, and later loading and saving tasks from a server. Every idea uses the same pattern you learned here: state in a parent, props down, events up.
See also: React Props, Updating Objects and Arrays in State, React Forms, JavaScript localStorage